MD-Memo Comprehensive Guide
A zero-latency Markdown scratchpad engineered for instant capture.
From first-time setup to advanced JSON-RPC IPC and autonomous CLI agent orchestration.
01 Getting Started: Core Philosophy
- Zero Save Anxiety: Notes autosave automatically after a 1.5-second idle pause.
- Instant Summon: Wake the app from your system tray in milliseconds via Ctrl+Alt+M.
- Zero Typo Friction: Autonomous IME Shield prevents accidental full-width characters inside code blocks and URLs.
AI features are organized around three verbs, Write, Run and Delegate, and each has exactly one entry point.
Eight keys to learn first (on macOS, read Ctrl as Cmd)
For the name of each part of the window, see A Tour of the Window. If you are not sure which feature to use, see Which one do I use?
A Tour of the Window
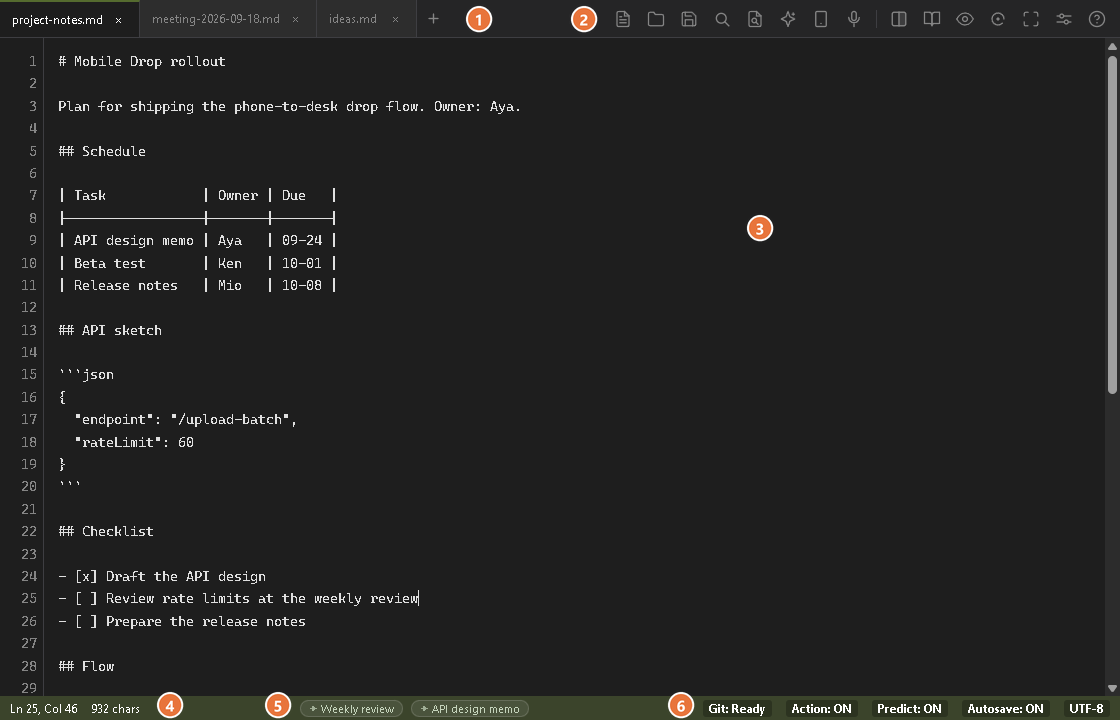
- Tab bar Your open notes. A dot marks unsaved changes, and + opens a new note
- Toolbar On the right: open file, open folder, save, find, search scraps, Ask AI, Mobile Drop, voice input, split / preview, settings and help
- Editor Line numbers on the left. The text is plain Markdown
- Status bar (left) Caret line and column, and the character count
- Related-note pills Notes from the opened folder that match what you are writing. Click one to open it
- Status bar (right) Git sync, Action, Predict, Autosave and encoding badges
To focus, use Zen mode (Shift + F11; macOS: Ctrl + Cmd + Z). The toolbar, tabs and status bar hide, and only the note stays. The window size does not change, so this is not full screen (add F11, which maximizes, if you want that). Press Esc or Shift + F11 again to leave.
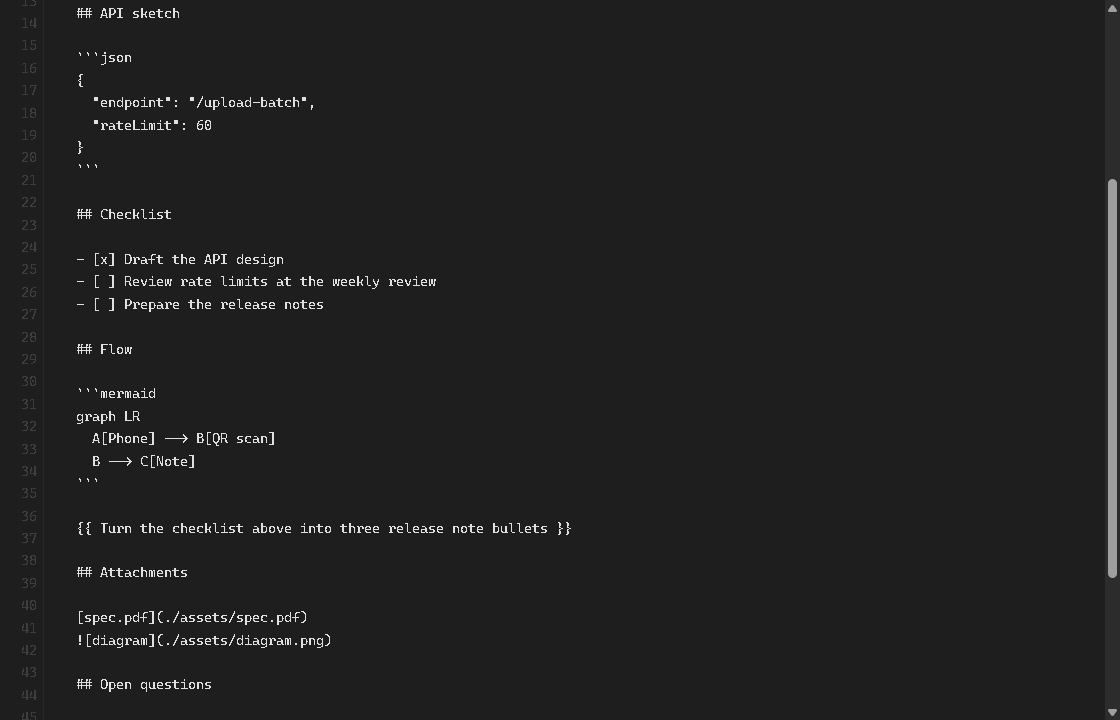
Each status bar item is explained in the next section, Reading the Status Bar.
Reading the Status Bar

- Caret position Line and column
- Character count Characters in the whole note
- Related-note pills Up to two
- Git sync State of the scraps folder. Click to sync
- Action Quick Actions: On / Manual / Off. Click to switch
- Predict Ghost text on or off. Click to toggle
- Autosave On or off. Click to toggle
- Encoding Click to switch between UTF-8 and Shift_JIS
| Position | Shows |
|---|---|
| Left | Caret line and column, character count, selection length (only while text is selected) |
| Center | Related-note pills, the LLM / processing indicator, messages |
| Right | Running-task badge (click to open the task panel, Alt + T), Git sync (click to sync), IME, Action (click to cycle On → Manual → Off), Predict (ghost text), Autosave, encoding (click to toggle) |
To make related-note pills appear
- Open a folderPress Ctrl + Shift + O and choose your notes folder. MD-Memo remembers it after a restart
- Keep writingStop typing and wait about 1.2 seconds
- Pills appearUp to two notes close to what you are writing are shown
- Click to openThe note opens in a new tab. Point at a pill to see its title, path and first line
If no folder is open, or no note is close enough, no pills appear.
Limits and details (scan range and scoring)
- Opening a folder shows "Loaded workspace: N notes found".
- Only
.md,.markdownand.txtfiles are scanned, up to 3 folder levels deep. - Folders that start with
., plusnode_modules,vendor,appdata,$recycle.bin,system volume informationandwindows, are skipped. - The scan stops at 300 notes, 1500 files or 2.5 seconds, whichever comes first. In a very large folder, later notes may not be considered, and you are not told.
- For each note, MD-Memo keeps the first heading (or the file name) as the title and the first line as the snippet.
- 1.2 seconds after you stop typing, it takes keywords (2 or more characters, up to 8) from the current line and the 250 characters before the caret.
- It scores every other note and shows the top 2 as pills.
| Where the keyword matched | Score |
|---|---|
| Title | 3 |
| Snippet (first line) | 1.5 |
| Path | 1 |
Installation & Launch
winget install youshinh.md-memo- Needs the Microsoft Edge WebView2 Runtime (included with Windows 11)
- MD-Memo cannot start without the runtime
brew install --cask youshinh/tap/md-memo- macOS 10.15 or later
- The first launch needs the step in "macOS First Launch" below
Releases are ad-hoc signed and not notarized by Apple, so Gatekeeper blocks MD-Memo.app the first time. Right-click (Control-click) the app in Finder and choose Open, or run xattr -dr com.apple.quarantine "MD-Memo.app" once.
Limits and details (other ways to get it, update check)
- Install from a zip: Download a zip from the Releases page and unpack it into any folder.
- Universal binary: Starting with the next release, the macOS build is a universal binary and supports both Apple Silicon and Intel Macs.
- No Mac to test on? Every push to the repository builds
MD-Memo.appon GitHub's hosted macOS runners. Open the Actions tab (or trigger the CI workflow by hand with Run workflow), open the latest CI run, and downloadmd-memo-macos-<commit-sha>from Artifacts. It is ad-hoc signed the same way, so the same first-launch step applies. - Update check: Shortly after launch, MD-Memo asks GitHub whether a newer release exists (a single request to
api.github.com; no note content is sent). If there is one, a small badge appears on the Help (?) button.
System Tray & Instant Summon (Ctrl+Alt+M)
- The close button (✕) does not quit. MD-Memo stays in the system tray
- Garbage collection trims memory use to only 5–15 MB
- To quit completely, use the tray icon
- There is no menu-bar icon. Closing the window leaves MD-Memo in the Dock (memory is trimmed the same way)
- Click the Dock icon, or press the hotkey, to bring it back
- To quit, press Cmd+Q
Press the hotkey from any app. The window jumps to the front and the cursor returns to where you left it.
Pressing it again does not hide the window. To send MD-Memo back to the background, close the window.
Autonomous IME Shield (IME Guardian)
Typing inline code (`...`), code blocks (```) or URLs with the IME on can leave full-width letters such as cat or find, and the command then fails. IME Guardian removes that annoyance.
- Lexical scope protection: Inside code blocks, it steers you to half-width alphanumeric mode automatically (only 11 µs of input delay).
- Romaji auto-repair in direct input: If you type "konnitiha" while in half-width direct input mode, it is converted to hiragana for you.
Daily Scraps Model
MD-Memo creates a daily scrap file (scraps/YYYY-MM-DD.md) for you, for quick journaling and terminal pipe captures.
With Ctrl+Shift+F (described below), you can search years of daily scraps in milliseconds.
02 Capabilities Guide
Which one do I use?
| What you want | Entry point | What it does |
|---|---|---|
| Write Fix or draft the text in front of you |
Ask AI Ctrl + L (macOS: Cmd + L) |
The built-in LLM answers about your selection (or the current line) in seconds, and the answer appears right below it. |
| Run Execute a command |
Command Bar Ctrl + E (macOS: Cmd + E) |
Pipes your selection through a shell command and replaces it with the output. As fast as the command itself. Press Tab in the bar and the AI writes the command for you. |
| Delegate Hand off a whole investigation or implementation |
Auto selector Ctrl + Enter on a line (macOS: Cmd + Enter) or type {{ instruction }} |
MD-Memo decides whether the line goes to the built-in AI, an agent or a command, and the result lands below it. An external agent CLI (Claude Code, Codex, Hermes, Antigravity, …) works in the background for minutes. See Auto Selector. |
| Not sure what to do | Ctrl + J (macOS: Cmd + J) |
Suggests up to three next steps for what you are writing (Quick Actions). Each card maps to Write, Run, or Delegate. |
Telling the three verbs apart
- Acts on the text right in front of you
- Select it, then press Ctrl + L; the answer appears below
- Returns in a few seconds
- Use it when you want a command's output
- No need to wait for an AI
- Returns almost instantly
- Write a line, or
{{ ... }}, and press Ctrl + Enter - Research or implementation you would rather not do by hand
- Can take a few minutes
- You can keep editing the note while it runs
Write · Ask AI (Ctrl+L)
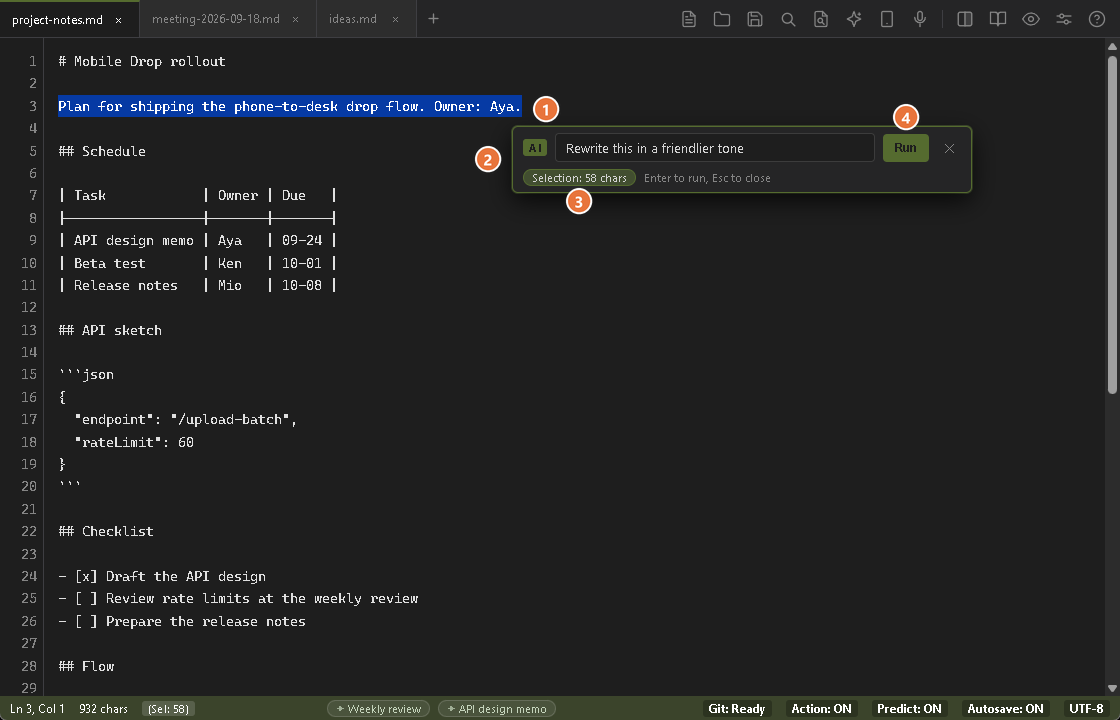
- Selected text The instruction applies to it. With nothing selected, the AI reads the current line, and on a blank line the whole note
- Ask bar Type what to do with the text
- Target chip What the AI will read: Selection (with its length), Current line or Whole note
- Run button Enter also runs it, and Esc closes the bar. The answer is inserted below the text
- Select text, or put the caret on a lineSelect the part you want to translate or summarize. With no selection, the AI reads the current line
- Press Ctrl + L and write an instructionThe ask bar opens right under the caret, with no dialog and no context switch
- Press Enter to runThe answer appears below your text. To cancel it, use the task panel (Alt + T)
Example instructions
- "Explain what causes this error and how to fix it"
- "Translate this into natural Japanese"
- "Summarize this into meeting-note bullets"
Ctrl + Enter opens this bar too. On an ordinary sentence, it asks for an instruction and saves it below the sentence as [[ @llm ... ]], with the answer under it. See Delegate · Auto Selector.
Common instructions live in the command palette (Ctrl + Shift + P). Pick one and the ask bar opens with a ready-made instruction:
- UNIX Pipe: Polish & Refactor: tightens the selection into concise, logical prose.
- UNIX Pipe: Convert to Bullet Points: extracts the key points as structured Markdown bullets.
- UNIX Pipe: Extract Action Items: pulls TODOs out of the text as a
- [ ]checklist.
Limits and details
- What the AI reads: the selection; with no selection, the current line; on a blank line, the whole note. The chip on the bar tells you which one applies. In an empty note it says "No target text (free question)" and only your instruction is sent.
- Where the answer goes: below the last line of that text, with one blank line before and one after. The selection or line itself is never replaced. On a blank line, the answer takes that line.
- If the LLM is not set up: the bar does not open. A message says "LLM is not configured (Settings -> AI Models)" and the note is untouched. That is the case when the model or the URL is empty, or when a cloud service such as Gemini or OpenAI has no API key (local servers such as Ollama need no key).
- While it works: a placeholder such as
[AI Generating: first 20 characters of your instruction...]sits in the note, and the answer replaces it when it arrives. - If it fails: one line,
[LLM error: ...], is left instead (the message is shortened to one line). - Cancel: the task panel (Alt + T) lists the request. Cancel it there and the placeholder disappears, so the note is back as it was. The request itself is not stopped; an answer that arrives later is discarded.
- Japanese input: pressing Enter to confirm an IME conversion does not send the instruction. Press Enter once more to run it.
- Other ways in: the toolbar AI button, the right-click item "Ask AI..." and the palette item "Ask AI" open the same bar. It uses the built-in text LLM (Settings → AI Models).
- Answer fences: if the model wraps its entire answer in a single
```markdown/```mdfence, MD-Memo removes that fence before inserting. A real code answer (```pythonand the like), or an answer that merely contains fenced blocks among other text, is inserted exactly as returned. - Old shortcut: if you had saved Ctrl + K for this bar, MD-Memo moves it to Ctrl + L once and shows a notice; the separate prompt dialog was merged into this bar.
Write · Ghost Text (Predictive Completion)
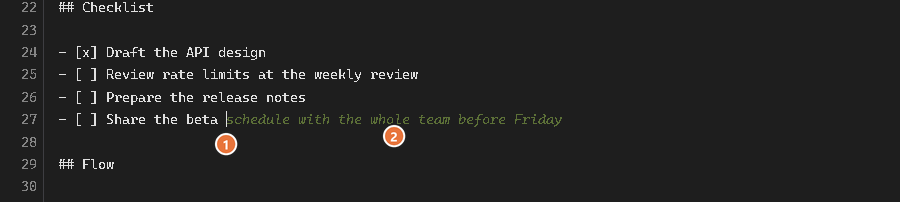
- Caret What you have typed so far
- Ghost text The grey prediction. Press Tab (or →) to accept it, and Ctrl + → to accept one word
Limits and details
- Suggestions come from a local LLM (Ollama / Gemma 4) or a cloud API. The setting is "Inline Autocomplete (Ghost Text)" in Settings → AI Models.
- The default wait before a suggestion appears is 500 ms. The settings screen allows 200–2000 ms, but the effective minimum is 300 ms.
- Click the "Predict" badge in the status bar to switch it on or off.
Write · Proofreading & Typo Correction (Alt+C)
- Select textPick the part you want to polish, such as meeting notes or a report
- Press Alt + CmacOS: Cmd + Shift + C. No prompt is needed
It polishes the text instead of rewriting your meaning, so it suits the final pass on meeting notes and reports. You can turn it on or off with "Enable AI typo & error correction (Alt+C)" in Settings → General.
Write · Paste Image OCR (Ctrl+V)
- Copy an imagePut a screenshot or a diagram on the clipboard
- Press Ctrl + V in MD-MemoGemini Vision OCR starts
- Markdown is pastedThe text, tables and code in the image arrive as structured Markdown
Limits and details (required settings)
- In Settings → AI Models → Image OCR (Vision), set an image model such as Gemini and its API key.
- The switch "Automatically transcribe pasted images (Ctrl+V) using Gemini OCR" must be on (it is on by default).
- It works only when the clipboard holds an image and nothing else. If there is also text, the text is pasted.
- A local vision model (Ollama or LM Studio) can do OCR without an API key.
- To paste the image as an image, without OCR, use special paste (Ctrl + Shift + V), which saves it to assets.
Write · Smart Paste (Ctrl+V / Ctrl+Shift+V)
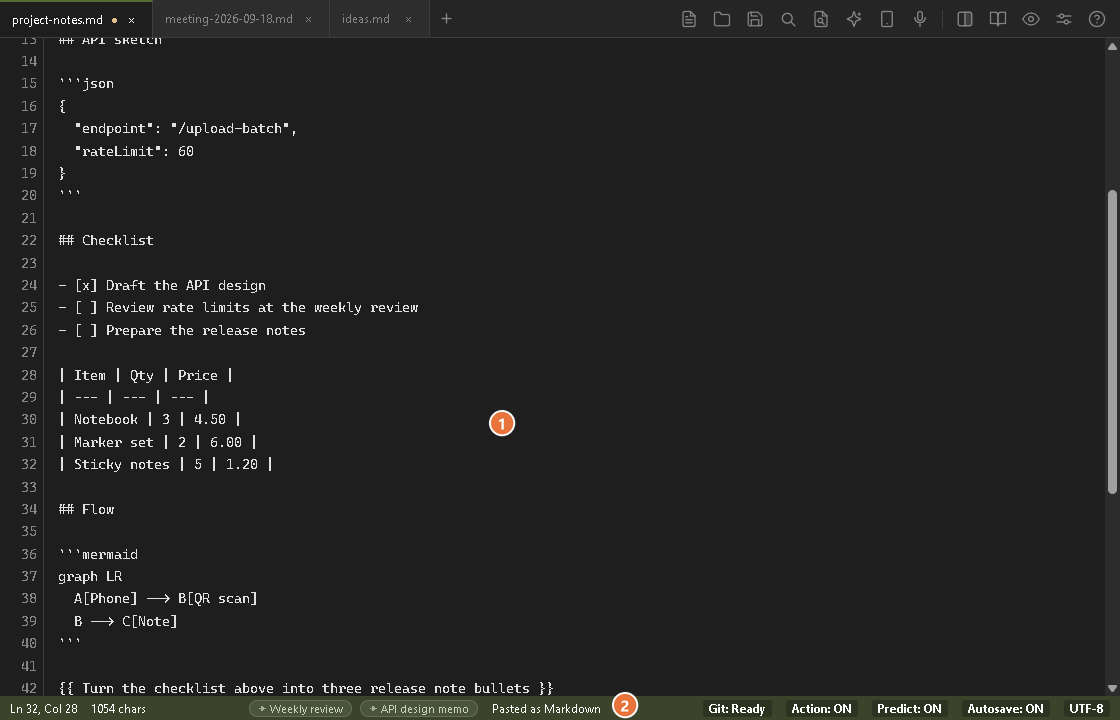
- Pasted table The HTML table was converted to a Markdown table
- Toast The status bar says "Pasted as Markdown"
- Text: Pasted as plain text, with the source formatting stripped
- If the clipboard has both text and an image, as Excel and Word do for cells and paragraphs, the text is pasted and the image is ignored
- Image only: The Image OCR vision model transcribes it to Markdown / Mermaid
- OCR needs "Automatically transcribe pasted images (Ctrl+V) using Gemini OCR" switched on and an API key (Settings → AI Models → Image OCR (Vision))
- HTML: HTML from web pages, Word and Google Docs is converted to Markdown and pasted
- HTML wins over an image on the same clipboard, so cells copied from Excel or a table from Word become a Markdown table
- Image only: Saved as
./assets/YYYY-MM-DD-HHmmss.png, andis inserted at the caret. It is not sent for OCR - Text only: Same result as Ctrl + V
Limits and details
What is converted (a built-in converter with no external dependency)
- Headings (h1 to h6), paragraphs, line breaks and horizontal rules
- Bold, italic, strikethrough, inline code, and fenced code blocks with a language
- Nested blockquotes, nested lists that keep their
startnumber, and task-list checkboxes - Links (with title) and images
- GFM tables with column alignment (a literal
|inside a cell is escaped) - The wrapper markup that Google Docs adds around copied content
Removed for safety: the contents of <script>, <style>, <iframe> and <svg>, javascript: and data: links, and data: images.
Saved image name: The extension follows the real image type (.png, .jpg, .gif or .webp). A name collision appends -2, -3, and so on.
Where ./assets/ lives: next to the note if it has been saved; otherwise the current workspace folder; and if there is no workspace either, the app data folder. In that last case the inserted link is an absolute file:/// link instead of a relative one.
If no HTML is available: If the paste event itself carries no HTML (some apps offer only plain text), Ctrl + Shift + V falls back to the async clipboard API. The embedded browser may then show its own one-time permission prompt. If that still yields nothing, plain text is pasted.
Toast: "Pasted as Markdown" for a converted paste, or "Image saved to assets" when an image-only clipboard was saved to ./assets/.
Ctrl + Shift + V is a fixed key and cannot be changed in Settings → Shortcuts. It used to open Preview to the Side; that command is now on Ctrl + Alt + V (macOS: Cmd + Option + V).
Write · Voice Input (Ctrl+Shift+R)
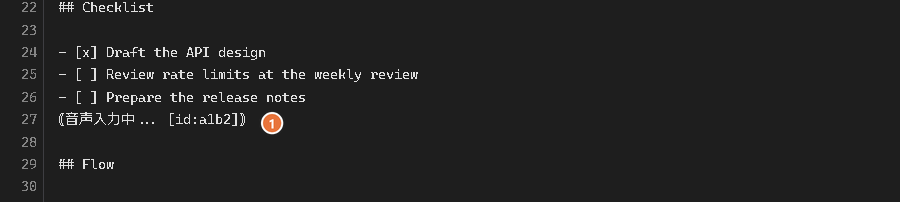
- Recording marker It is replaced by the transcript when recording ends (Esc discards the recording). The marker text is Japanese in both UI languages
- Start recordingCtrl + Shift + R (macOS: Cmd + Shift + R). A
⦅音声入力中... [id:xxxx]⦆marker is inserted at the caret. You can keep typing or click elsewhere while it records - StopClick the Stop button at the bottom left of the window, press Ctrl + Shift + R again, or stay silent for 5 seconds (1–30 seconds in settings) and it stops by itself. Esc discards it: the marker disappears and nothing is sent
- Wait for the resultThe marker changes to
⦅文字起こし中... [id:xxxx]⦆and is replaced by the text when it is done
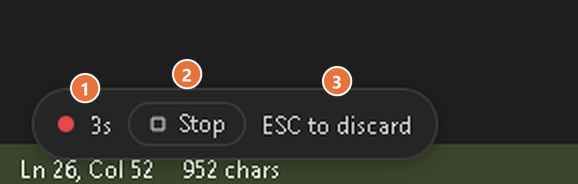
- Recording mark The red dot and the time since recording started
- Stop button Click it to stop recording and start the transcription (the same as pressing the shortcut again)
- ESC to discard Press Esc to throw the recording away
Four ways to start recording
If transcription fails
The recording is not lost. The audio is kept in the app data folder under voice_cache, and the marker changes to this:
⦅文字起こし失敗: [再試行(id:xxxx)] [音声保存] [破棄]⦆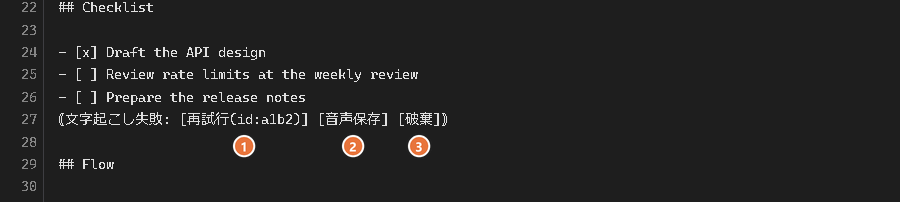
- [再試行] Retry: send the saved audio for transcription again
- [音声保存] Keep audio: move it to the note's
./assets/and insert an[audio](...)link - [破棄] Discard: delete the saved audio and remove the marker
This recovery also works after you restart the app (the saved audio and the marker's id survive a restart).
Settings (Settings → AI Models, "Voice input" group, right below the Image OCR (Vision) settings)
| Setting | Default | Description |
|---|---|---|
| Voice model | gemini-3.5-transcribe |
Suggestions: gemini-3.5-transcribe, gemini-2.5-flash, gemini-flash-lite-latest. |
| API style | Auto | Auto / Interactions API / generateContent. Auto uses the Interactions API when the model name contains "transcribe", and generateContent otherwise. |
| Language codes | Empty | Comma-separated BCP-47 codes (for example ja-JP, en-US). Empty means auto-detect, which also handles mixed languages. |
| Mode | Smart | Smart removes fillers and formats the text for reading. Verbatim transcribes word for word. |
| Custom vocabulary | Empty | One term per line (names, jargon). Up to 1000 terms, but about 100 works best. |
| Silence timeout (s) | 5 | 1–30. Recording stops by itself after this many seconds of silence. |
| Transcription prompt | Built-in instruction | Used only by generateContent-style models. |
| API key / Base URL | Empty | Empty means the Image OCR (Vision) settings are used. There is no separate input field for them. |
Messages and errors
Each message is shown in the status bar for 6 to 9 seconds.
| Message | Meaning and what to do |
|---|---|
| Preparing the microphone... | Shown right after you press the key. |
| Waiting for microphone permission. ... | Shown when there is no answer after 5 seconds. The first time, WebView2 shows its own permission prompt: choose Allow. MD-Memo never grants microphone access silently. |
| Microphone access is blocked. ... | In Windows Settings → Privacy & security → Microphone, let desktop apps access your microphone. |
| No microphone was found | No microphone is connected. |
| The microphone cannot be opened. ... | Another app may be using the microphone. |
| Could not use the microphone | A general message for anything not covered above. |
| Voice input works in the editor view | Shown when you press the key in the rendered preview view. Go back to the editor view. |
Limits and details (model, privacy, requirements)
- Model: The default is
gemini-3.5-transcribe(it used to begemini-2.5-flash). Gemini models only: there is no offline or non-Gemini option. - How it is called: Google's Gemini 3.5 Transcribe is called through the Interactions API (
POST {base}/v1beta/interactions, headerx-goog-api-key). Older models such asgemini-2.5-flashrun through generateContent with a prompt. - The live model cannot be used:
gemini-3.5-transcribe-liveis the streaming (Live API) variant and cannot be used for recorded audio. Choosing it shows an error that says so. - Privacy: MD-Memo always sends
store: false, so Google does not keep the recording or the transcript. - Keys: If the API key and Base URL are empty, the Image OCR (Vision) settings are used. The config file also has
voice.apiKey/voice.baseUrlkeys, but the settings screen has no field for them. - Japanese IME: The shortcut works even while the IME is on.
- Microphone permission: The permission prompt comes from the embedded browser (WebView2), not from the OS, and only the first time you record.
- macOS: A microphone usage description is built in, but behavior on macOS has not been fully verified yet.
Run · Command Bar (Ctrl+E)
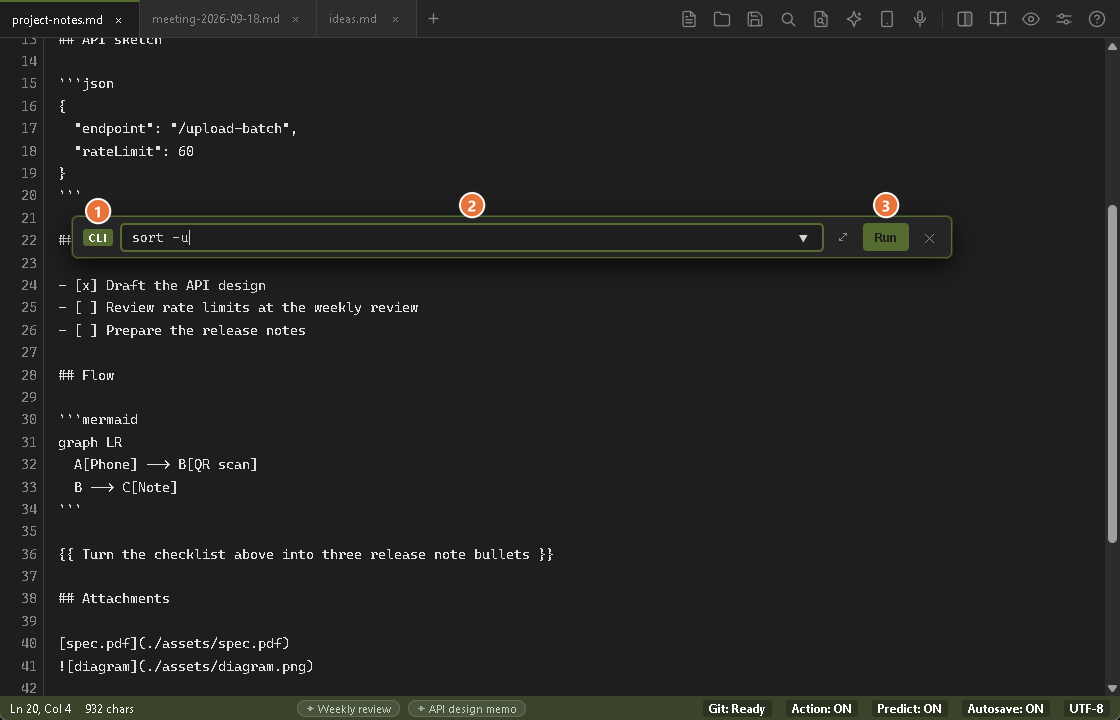
- Mode badge It says "CLI". Click it, or press Tab, to switch to AI mode. The mode you pick is remembered
- Command field Type a shell command, or pick one from the drop-down list: your recent commands and ready-made ones such as
sort -u,jq .andgit status - Run (Enter) Sends the selection (or the whole note if nothing is selected) to the command, and its output comes back
- Select textIf you select nothing, the whole note is used
- Press Ctrl + E to open the barIt opens in the mode you used last (CLI mode the first time). If the badge says "AI CLI", press Tab
- Type a command and press EnterThe selected text is replaced by the command's output. Esc closes the bar
Ctrl + E opens one command bar in the mode you used last. Press Tab, or click the badge at the left edge of the bar (CLI / AI CLI), to switch modes at any time. Rule of thumb: if you can write the command yourself, use CLI mode; if you can't, use AI mode.
The two keys that open one specific mode, "Command Bar: CLI mode" and "Command Bar: AI mode", have no default key. You can assign them in Settings → Shortcuts (group "Command Bar").
Example commands (type them yourself)
jq .: pretty-print and indent JSONsort -u: drop duplicate lines and sort alphabeticallytr a-z A-Z: convert to uppercaseduckdb -box: run SQL inline and print a table
Limits and details
- What happens to the result: It is set by "Open CLI execution results in a new tab" under Settings → Agent, in the "Commands (Run)" section. When it is on (the default), the selected text is replaced by the output and the result also opens in a new tab. When it is off, no new tab opens, and with no selection the whole note is replaced by the output.
- Empty output: If a command succeeds but prints nothing, the result tab shows "(no output)".
- Working directory: Commands run in MD-Memo's own working directory.
- The drop-down list: Your recent commands come first, then your own
commandsnippets from agents.yaml, then the fixed filters (sort,sort -u,jq .,tr,wc -l,duckdb -boxand more), then the built-in command snippets for your OS: Current date and time, Git status, Git diff summary, Git recent commits, List large files and List files. A snippet whose body has a placeholder such as${selection}or$0is left out. The same snippets can be inserted as[[ $ ... ]]tasks (see Auto Selector).
Run · Command Bar: AI Mode (Ctrl+E, then Tab)
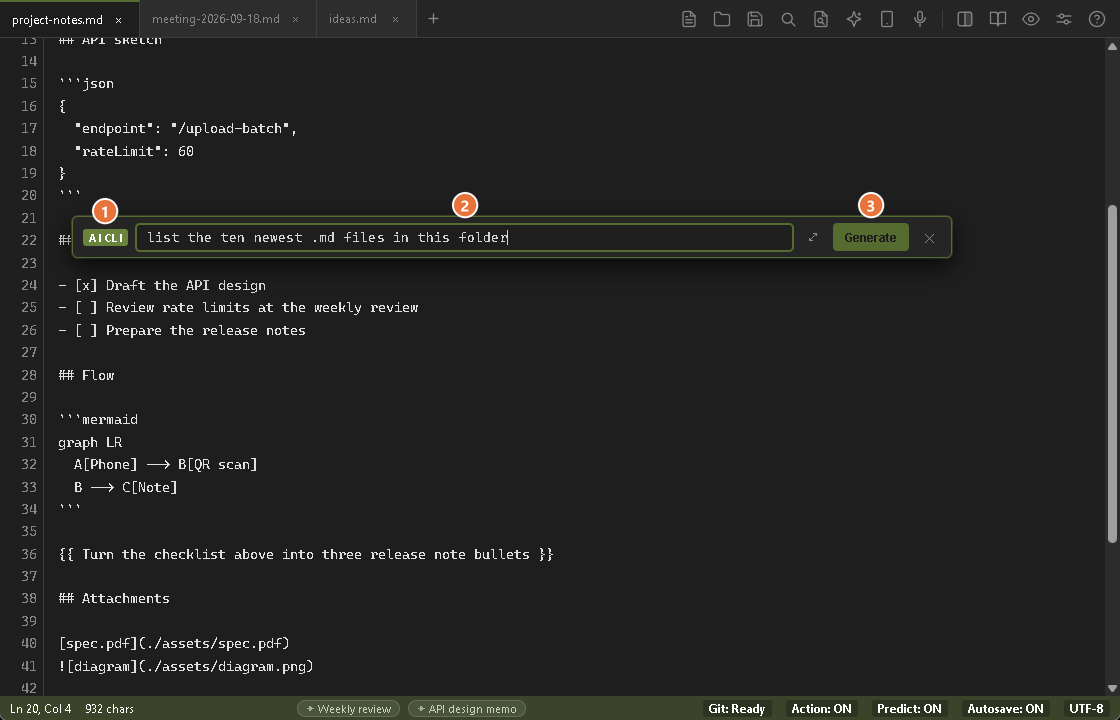
- Mode badge It says "AI CLI". Click it, or press Tab, to go back to plain CLI mode
- Request field Instead of writing a command, describe what you want in plain words
- Generate (Enter) The AI writes the command into the field so you can check it. Press Enter again to run it
- Press Ctrl + E, then TabThe badge at the left edge must say
AI CLI(if it already does, skip Tab). The bar opens in this mode next time - Describe what you want to doFor example: "find files modified in the last 24 hours" or "kill whatever is using port 8080"
- Press Enter to generateThe AI writes the matching shell command and puts it in the bar
- Read it, then press Enter to runAlways read the command before you run it
Every generated command goes through a safety check before it runs. Commands that could destroy your system are refused, and risky ones show a warning.
Delegate · Auto Selector (Ctrl+Enter)
Four keys, four jobs (on macOS, read Ctrl as Cmd)
![A note after Ctrl+Enter on a request line: the line now reads [[ @llm Translate the checklist above into Japanese ]], and the translated checklist sits below it between two HTML comment lines](./img/manual/en/auto-sel-result.png)
[[ @llm ... ]] and the answer arrived below it- Your instruction The line was rewritten as
[[ @llm ... ]]and stays in the note - Opening comment line Marks where the result starts (
md-memo:resand a short id) - The answer It sits between the two comment lines
- Closing comment line Marks where the result ends
How to use it
- Write one lineA request such as "Translate the checklist above into Japanese", or a command such as
git status - Press Ctrl + EnterWith the caret on that line. macOS: Cmd + Enter
- Let it workAn AI request runs at once. For an agent or a command, the line is rewritten and waits: press Ctrl + Enter again to run it, or Ctrl + Z to undo the rewrite
- Read the result below the lineIt sits in a block between two comment lines. Press Ctrl + Enter on the instruction line again to run it again; the block is replaced
An agent or a command waits for a second press. The line is rewritten, and a message tells you how to go on. An agent task is written for your default agent (Settings → Agent), or for the agent you name with @.
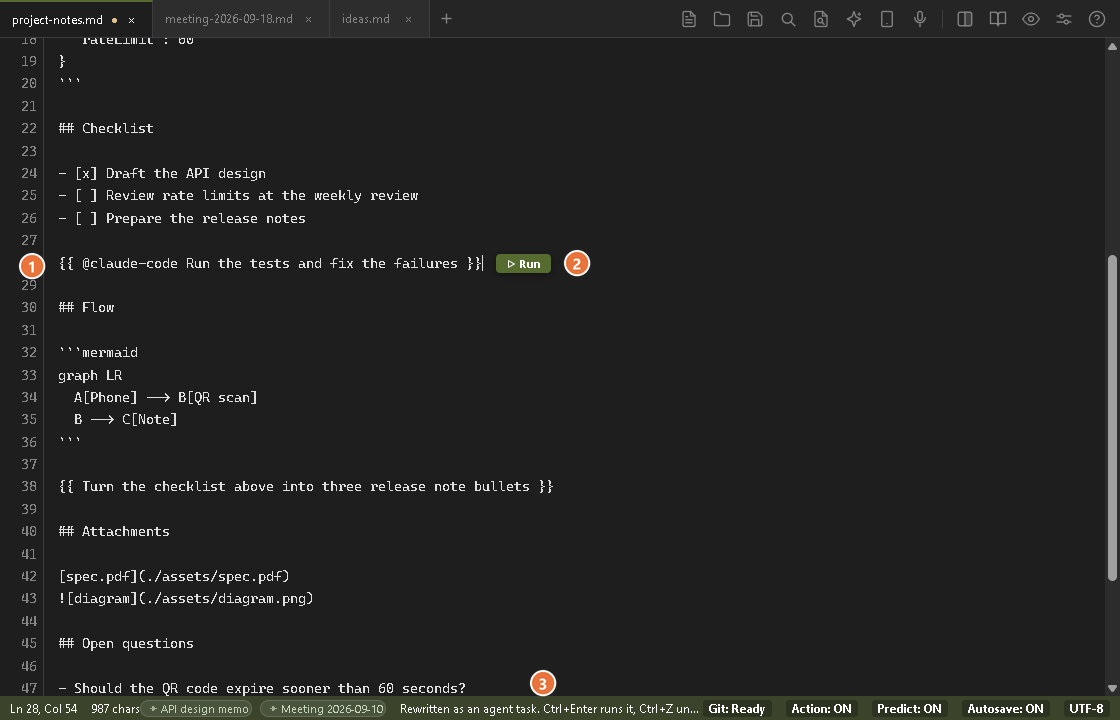
{{ @claude-code ... }} and stopped- Rewritten line The request became an agent task. It has not run yet
- Run button The same as pressing Ctrl + Enter again
- Message Says how to go on: Ctrl + Enter again to run it, Ctrl + Z to undo the rewrite
Both behaviors have a switch in Settings → Agent, in the "Auto selector (Ctrl+Enter)" group. See Agent & CLI Tab.
An ordinary sentence opens the ask bar. When the line is not clearly a request, MD-Memo asks what to do with it. What you type is saved below the line as [[ @llm ... ]] and runs.
![The ask bar opened by Ctrl+Enter on an ordinary sentence: an instruction is typed, the chip says Current line, and the hint says the instruction is saved in the note as [[ @llm ... ]]](./img/manual/en/ask-bar-record.png)
- The line An ordinary sentence, not a request. The bar is about this line
- Ask bar Write what the AI should do with the line
- Target chip What the AI will read: the current line, or your selection
- Hint The instruction is saved in the note as
[[ @llm ... ]]
Two ways a result comes back
{{ ... }}- The result replaces the slot
- Every hand-written
{{ ... }},[? ],【? 】,[! !],[>> ]and{{ @skill ... }} - Undo it with Esc or Ctrl + Z (see Delegate · Agents)
[[ @llm ... ]],[[ $ ... ]]and{{ @agent ... }}- Your instruction stays, and the result goes below it
- Run it again and the old result is replaced
Notations and the result block
| You write | It goes to | The result |
|---|---|---|
[[ @llm instruction ]] | The built-in text LLM (Settings → AI Models) | Below the line |
[[ $ command ]] | A shell command, with no input. It passes the same safety check as the command bar | Below the line, in a code block |
{{ @agent instruction }} | An agent from agents.yaml. agent is its key or an alias, not case-sensitive | Below the line |
A classic {{ ... }} | As before: the profiles and {{ @skill ... }} | Replaces the slot |
- What counts as a notation: A
[[ ... ]]is a task only when it starts with@llmor$, so wiki links such as[[Note name]]are left alone. A{{ @name ... }}is an agent task whennameis an agent's key or alias. Otherwise it is a skill, as before. - One line per task: The whole notation must fit on one line. It may follow a list or quote mark, as in
- [[ @llm ... ]]or> {{ @claude ... }}, and a rewrite keeps that mark. Notations inside code blocks or inline code are ignored. - Agent tasks: The instruction reaches the agent as you wrote it. The standing instruction of the
{{ }}notation (code blocks only) is not added. If nothing follows the name and that agent takes an instruction, the task ends with an error line (its text is Japanese in both UI languages).
What the result looks like
[[ @llm Translate this into English ]]
<!-- md-memo:res a1b2 -->
The translated text
<!-- /md-memo:res -->- Result block: Two HTML comment lines with the answer between them. The short id (
a1b2, usually 4 characters) is unique in the note. A run never changes your instruction line. The answer is trimmed, and no blank line is added inside. Nothing inside a result block is ever run, even if the answer contains a{{ }}. - While it runs: A one-line marker,
<!-- md-memo:run a1b2 -->, sits under the line, and the status bar shows the running-task badge. - Where you see the comment lines: The editor shows them, and MD-Memo's own preview hides them (a viewer that passes HTML through does not display them either). You may delete them by hand. If you delete the marker while a task runs, the answer is added at the end of the note.
- Run again: Press Ctrl + Enter on the instruction line. The old result block (or a marker left behind by a crash) is replaced, so results do not pile up. While a task is running you get "This slot is already running."
- Cancel: Press Cancel on the task in the task panel (Alt + T), which also lists AI and command tasks. The marker disappears and the note is as it was. An AI request cannot be stopped at the provider, so MD-Memo forgets it and drops a late answer. A command or an agent is stopped. If you cancel a re-run, the old result does not come back.
- If it fails: The block holds one line,
[LLM error: ...]or[agent name error: ...]. A command's block holds its output, its error output and anexit code Nline. - What the AI receives: Only your instruction. A task recorded through the ask bar sends the instruction and the text it was about. Its opening comment then reads
ctx=above n=1(n is the number of lines of that text), for example<!-- md-memo:res a1b2 ctx=above n=1 -->. On a re-run the same text is sent again: up to n non-blank lines directly above the instruction (looking past other task lines and result blocks; at most 80 lines or 8000 characters). A task you wrote by hand, made from a snippet or made by rewriting a line carries no such mark, so only what is inside its brackets is sent.
How it decides, and when something is not set up
The check runs on your PC with fixed rules. It uses no network and calls no model. Each time you press the key, it reads one line, or your selection.
What Ctrl + Enter does, in this order
- While a Japanese IME is converting text, the key is left alone. A held-down key runs only once.
- The caret is inside a result block: nothing runs. The status bar shows "This is a result block. Write your instruction outside of it."
- A task in the new notations is under the caret (with a selection: under the start of the selection, else the first one inside it): only that task runs. Several lines never run at once.
- The caret is inside a classic
{{ }}slot: it runs, and its result replaces it, as before. - The Auto selector is off, the line is blank, or the line holds a slot that the caret is not inside: the older rule applies. The next slot after the caret runs, and if there is none, the first slot in the note (with no slot at all, the status bar says so). Inside a fenced code block nothing happens.
- Otherwise the target is your selection, or the current line. If the selection covers only part of a line or several lines, or the line is not clearly a request, the ask bar opens.
- If the whole line looks like a request, MD-Memo decides where it goes:
| The line is judged to be | What happens |
|---|---|
| An instruction for the AI | If the LLM is set up, the line becomes [[ @llm ... ]] and runs at once. |
| A job for an agent | The line becomes {{ @agent ... }} and waits. Press Ctrl + Enter again to run it. |
| A command | The line becomes [[ $ ... ]] and waits. Press Ctrl + Enter again; the safety check runs first. |
With "Confirm before an auto-detected agent or command runs" switched off, an agent or a command runs right after the rewrite. An AI instruction always runs at once.
What counts as an instruction
- A request: a request phrase (Japanese endings such as ...してください, or English such as "please" and "can you"), a question with a question word or a question mark, or an English command word such as translate, summarize, fix, write or explain.
- Not a request (the ask bar opens): ordinary statements, headings, URLs, code, table rows, and a line longer than 240 characters.
- Where it goes: the AI for wording jobs (translate, summarize, proofread, rephrase, bullet points, tables, ideas, explanations). An agent for code and project jobs (implement, refactor, run the tests, commit, pull request, build, research, fix a bug, read an error log). A command for a line that starts with a known command such as
git status, or a pipe such asgit log | head. If nothing fits, the AI (a text-only answer is the safe side). - You can say it yourself: a line that starts with
@llm,@agent(a key or an alias) or$goes where you said. - Risky commands are never guessed: a line such as
rm -rf build(delete, move, copy, sudo and the like) opens the ask bar. To run one, write[[ $ ... ]]yourself; the safety check then decides.
It can be wrong. The rules are fixed, so a polite request to a person, such as "Please share the materials in advance.", also looks like a request to the AI. When the check is not sure, it opens the ask bar and leaves your note alone until you send an instruction. A wrong guess for an agent or a command is easy to undo, because the line is rewritten first and waits (Ctrl + Z).
When something is not set up
| Situation | What happens |
|---|---|
| The LLM is not set up (the model or the URL is empty, or a cloud service such as Gemini has no API key) | The status bar shows "LLM is not configured (Settings -> AI Models)". Your note is not touched: no rewrite and no marker. Local servers such as Ollama need no key. |
| The agent is not found (agents.yaml or PATH) | The line is rewritten anyway, and a second message warns that the agent was not found. Running it ends with an error line in the result block. |
| The command is dangerous | The same safety check as the command bar refuses it ("Security Block: reason"). A warning-level command asks you to confirm. If it is refused or you cancel, nothing runs and no result is written. |
| A command is slow | It is stopped after 30 seconds. If no answer arrives within 40 seconds, the task fails with "No answer from the command (timed out)". |
| The note changed before the answer could be written | The status bar shows "The note changed in the meantime. Press the key again." If you close the note while a task runs, the answer is dropped. |
Ready-made tasks (snippets)
Insert a ready-made task instead of typing one. The picture shows the command palette route. Typing {{ lists the same snippets after the notations, and a short word such as ;sum plus Tab inserts one at once.
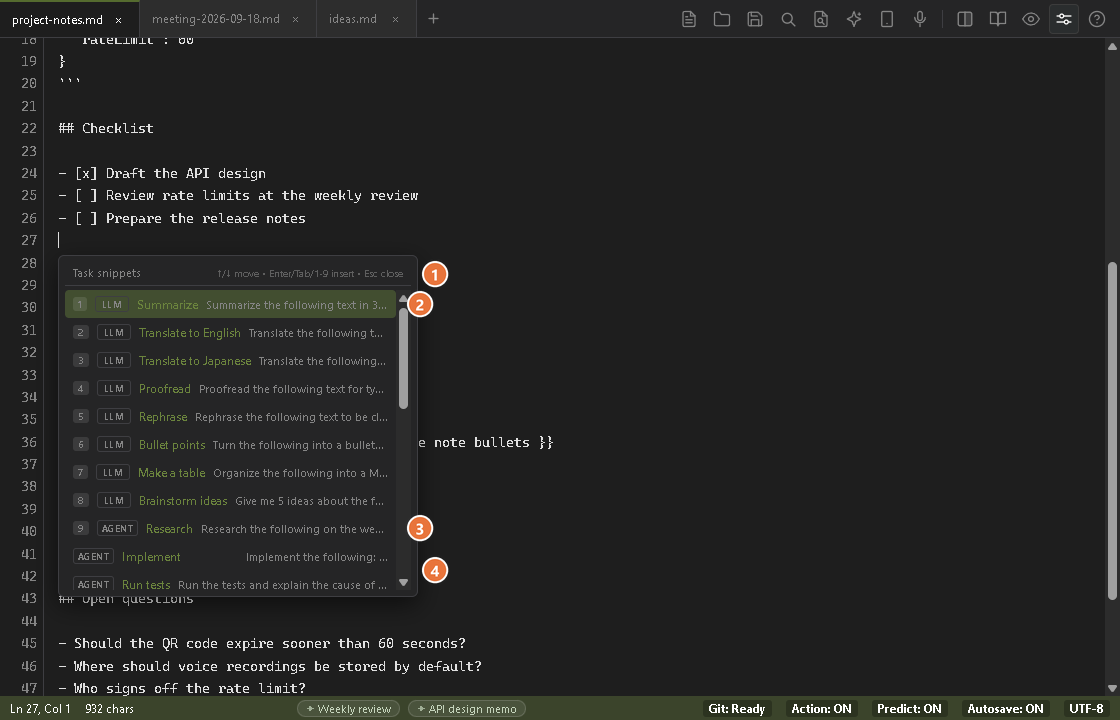
- Header The keys: Up and Down move, Enter, Tab or 1-9 insert, Esc closes
- A snippet Its number key, a kind tag, its name and a one-line preview. The first nine can be inserted with the keys 1-9
- Kind tags LLM (the built-in AI, the answer lands below), AGENT (an agent), CMD (a command) and TEXT (plain text)
- The list scrolls The command and text snippets follow, then your own snippets from agents.yaml
Snippets, your own snippets and aliases
Three ways in
- Type
{{: The quick selector (the popup under the caret) lists the notations first, then the snippets, with a kind tag, a name and a one-line preview. The first nine rows have a number key. Enter, Tab or a number inserts one in place of the{{, and Esc closes it. Typing[[opens nothing, so wiki links are not disturbed. The header of this popup is Japanese in every UI language. - Command palette: Choose "Insert task snippet". It lists only the snippets, at the caret.
- A short word and Tab: At the start of a line or after a space, type an exact short word such as
;sumand press Tab. Any other Tab works as before. Nothing is expanded inside code.
Inserting never runs anything. The caret lands where your text goes; press Ctrl + Enter to run the task.
Built-in snippets
| Kind | Short word and name |
|---|---|
| LLM becomes [[ @llm ... ]] | ;sum Summarize, ;en Translate to English, ;ja Translate to Japanese, ;proof Proofread, ;rephrase Rephrase, ;bullets Bullet points, ;table Make a table, ;ideas Brainstorm ideas |
| AGENT becomes {{ @agent ... }} | ;research Research, ;impl Implement, ;test Run tests, ;review Review, ;refactor Refactor |
| CMD becomes [[ $ ... ]] | ;date Current date and time, ;gst Git status, ;gdiff Git diff summary, ;glog Git recent commits, ;grep Search for a word, ;rg Search for a word (ripgrep), ;wc Count lines (file), ;uniq Unique sorted lines (file), ;jq Pretty-print JSON (jq), ;big List large files, ;ls List files |
| TEXT inserted as it is | ;llm LLM task (blank), ;agent Agent task (blank), ;cmd Command task (blank) |
- One version per OS: A command that differs between systems is listed only in the version for yours: PowerShell on Windows, sh on macOS and Linux.
- Placeholders:
${selection}(the selected text),${line}(the current line),${date}(today, YYYY-MM-DD),${agent}(your default agent) and$0(where the caret lands). Write$$0or$${for a literal$0or${. - The selection:
${selection}is filled when you insert from the command palette with text selected. Otherwise it is empty. - Safe by design: A substituted value becomes one line and cannot break a
[[ ]]or{{ }}. In a command, quotes,$,;,|and other shell characters are removed from it.${selection}and${line}are cut at 2000 characters in a task and 300 in a command.
Your own snippets and aliases (in agents.yaml, see Customizing it in agents.yaml)
agents:
  my-agent:
    command: "my-cli"
    args: ["--prompt", "{instruction}"]
    aliases: ["mine", "m"]   # {{ @mine ... }} and {{ @m ... }} call my-agent

snippets:
  - id: "weekly"
    label: "Weekly review"
    kind: "llm"
    trigger: "/weekly"
body: "Summarize this as a weekly review in 3 points: ${selection}"- Aliases:
aliasesgives an agent extra names for{{ @name ... }}. Names are not case-sensitive, and a key wins over another agent's alias. Built in:claudeandccfor claude-code, andantigravityandgeminifor agy (hermes and codex have none). If your file defines claude-code or agy without analiasesline, these defaults still work, unless another agent already uses the name. A list you write is used as it is. - Snippet fields:
id,label,kind(llm,agent,commandortext) andbody. Optional:trigger,os(win,unixorany; for commands) andagent(the agent for akind: agentsnippet; the default agent if left out). - Replace or add: A snippet with the
idof a built-in one replaces it, and a newidadds one. A snippet with an unknownkindor an emptybodyis ignored. - Trigger: No spaces, 2 to 30 characters. Capitals become lower case and full-width letters become half-width, and the word must match exactly. Built-in words start with
;, and/weeklyworks as well. - When it applies: The
{{list, the palette list and short-word expansion read aliases and snippets when MD-Memo starts, so restart it after you edit them. Running{{ @alias ... }}and the command bar's drop-down list use the new file without a restart (the agent is looked up when the task runs, and the bar reads the file each time it opens). - Command bar: Command snippets that need no placeholder, in the version for your OS, are also offered in the drop-down list of the command bar.
Delegate · Hand work to an agent ({{ }})
{{ instruction }} in a note and press Ctrl + Enter. An external agent CLI works in the background, and the whole {{ }} is replaced by the result. Name an agent, as in {{ @claude instruction }}, and the result goes below your line instead. Agent CLI needed separatelyThis notation is called a slot. To let MD-Memo choose the AI, an agent or a command for a plain line, see Delegate · Auto Selector.
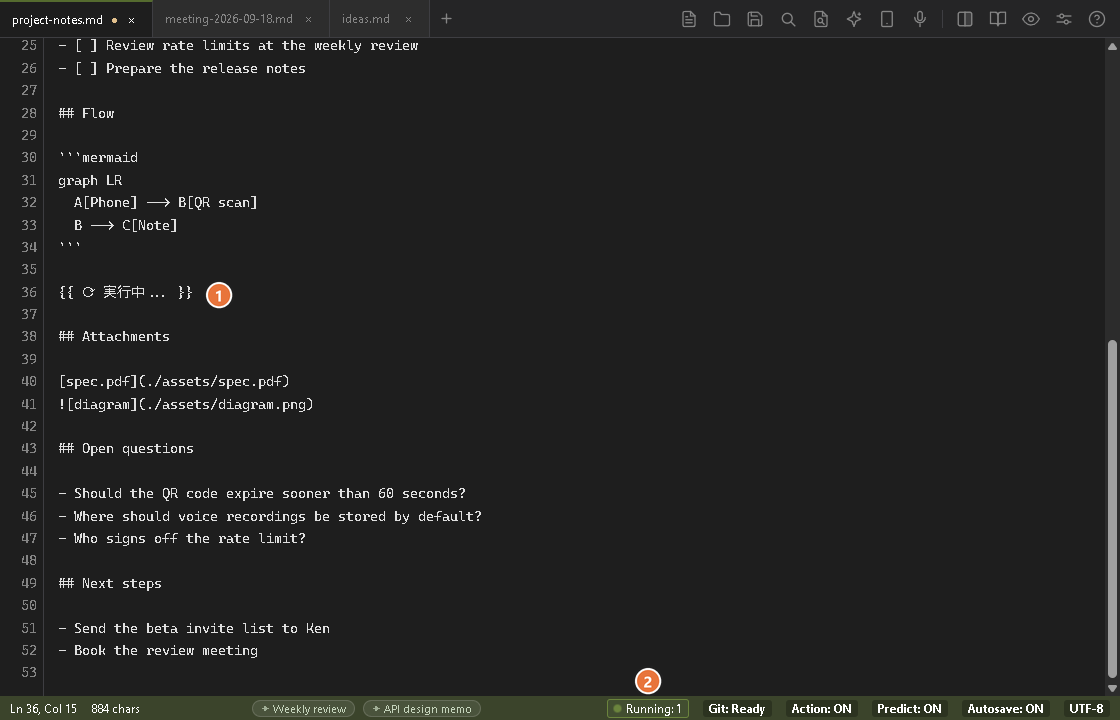
{{ }} becomes a "running" placeholder and the status bar shows a task badge- Running placeholder It stands in for the slot while the agent works, and the result replaces it (its text is Japanese in both UI languages)
- Task badge The number of running agent tasks. Click it, or press Alt + T, to open the task panel
- Answers in seconds
- The answer goes in below your text
- Spends minutes on web research or file work
- You can keep editing the note the whole time
{{ }} and nothing else
The other notations below are all variations on it. When in doubt, write plain language inside {{ }} and it will work.
How to run one
- Type
{{A quick selector opens just below the caret and lists the notations you can use, then ready-made task snippets - Choose a notationMove with ↑ ↓ and confirm with Tab or Enter. 1–9 picks an entry at once. Esc closes it
- Write the instruction
{{ code:…}}is inserted, and the caret lands where the instruction goes - Press Ctrl + Enter to runmacOS: Cmd + Enter. You can also click the small Run button (it carries a play icon)
{{ code: write a Go function that loads this project's config file }}

[? What is Go's release cadence in 2025, and what is the current stable version? ]
Limits and details (the run key and input correction)
- Which one runs: A slot or task under the caret runs. On a plain line, the Auto selector takes over (it is on by default). When the Auto selector is off, or the line is blank, Ctrl + Enter uses the older rule: it runs the next slot after the caret, and if there is none, the first slot in the note. Inside a code block it does nothing.
- When none is found: The status bar shows "No slot found to run (place the cursor inside a {{ }}-style block)." for a few seconds. This appears only when the older rule applies and the note has no slot at all. Your note is not changed.
- If it is already running: The status bar shows "This slot is already running."
- Run button: A small button with a play icon. It appears next to a complete block that is not running yet, while the caret is inside it (hover text: "Run this slot (Ctrl+Enter)"; on macOS, Cmd+Enter). It also appears at the right end of a task line (
[[ @llm ... ]],[[ $ ... ]],{{ @agent ... }}) that is not running. Clicking it does the same as pressing Ctrl + Enter. - Quick selector: It also disappears on its own as soon as you keep typing normal words.
- Japanese input: If a Japanese IME turns your brackets into full-width characters (
{{,【?), they are converted back to half-width automatically. - No accidental runs: Delimiters inside fenced code blocks, inline code, Markdown links and bare URLs are never treated as slots, so a
{{ }}in a code sample does not fire.
The default notations
| Notation | Profile | Default agent | What it is for |
|---|---|---|---|
{{ ... }} |
code | claude-code | Code generation. Returns a runnable code block with no preamble. |
[? ... ] |
research | claude-code | Research. Searches the web and answers concisely with figures and primary-source URLs. |
【? ... 】 |
writing | hermes | Writing. Stays fully local — no outbound calls — and reshapes the text into clear bullets. |
[! ... !] |
adversarial | claude-code | Adversarial review. Names three risks, vulnerabilities, or bottlenecks instead of agreeing with you. |
[>> ... ] |
deep-research-and-code (recipe) | default agent | Multi-step run: research → risk critique → implementation, in order. |
- Each notation carries its own agent and its own standing instruction (system instruction), so the same sentence comes back in a different shape depending on which one you use.
- Any slot can start with a role name (for example
{{ research: something to look up }}). This name becomes the label for that task in the task panel. - If your project has
skills/<name>/SKILL.md, writing{{ @skill-name: instruction }}passes that file's contents to the agent as extra instructions. If it cannot be found, the slot is replaced by an error. A name that is an agent's key or alias is an agent call instead (next item). - Naming an agent:
{{ @claude-code instruction }}hands the instruction to that agent directly. The name is a key underagentsin agents.yaml, or one of itsaliases(not case-sensitive). By defaultclaudeandccmean claude-code, andantigravityandgeminimean agy. Unlike the notations above, your line stays and the result goes below it, and the notation's standing instruction (code blocks only) is not applied. Details: Auto Selector.
While it runs, and the task panel (Alt+T)
The moment a slot starts, it turns into {{ ⟳ 実行中... }} in place. A task in the new notations keeps its line and gets a one-line marker below it instead. The agent runs in the background, so you can edit elsewhere in the note, or start several slots at once.
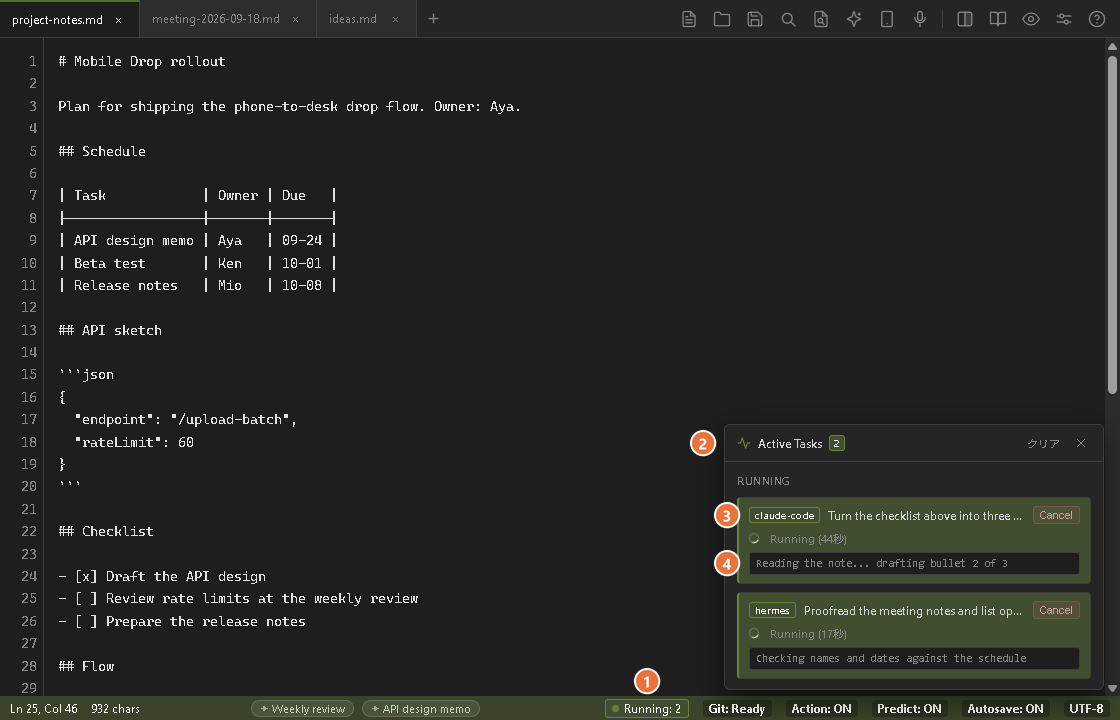
- Task badge In the status bar. Click it, or press Alt + T, to open the panel
- Panel title The number of active tasks. The clear button empties the history
- A running task Agent name, instruction, elapsed time and a Cancel button
- Live output The agent's latest output (Hover Peek), updated while it runs
- Task panel: Press Alt + T (macOS: Option + T), or click the running-task indicator in the status bar. It lists the running tasks and a short history, including AI requests (Ask AI and the Auto selector) and commands.
- Progress (Hover Peek): Each task card shows the agent's latest output line, refreshed every second, so you can tell whether it is stuck or moving.
- Cancel: The card's Cancel button ends the process, and the slot goes back to your original instruction. For a task in the new notations, the marker line under it disappears.
- Timeout: 180 seconds by default. After that the slot is replaced by a timeout message. You can set 10–600 seconds under Settings → Agent, in the "Agents (Delegate)" section. But if an
agents.yamlalready exists (even one created by "Open agents.yaml"), the file's value wins.
Results are merged only after you have stopped typing for about half a second, so an agent finishing mid-sentence never moves your caret out from under you.
Getting the result, and undoing it
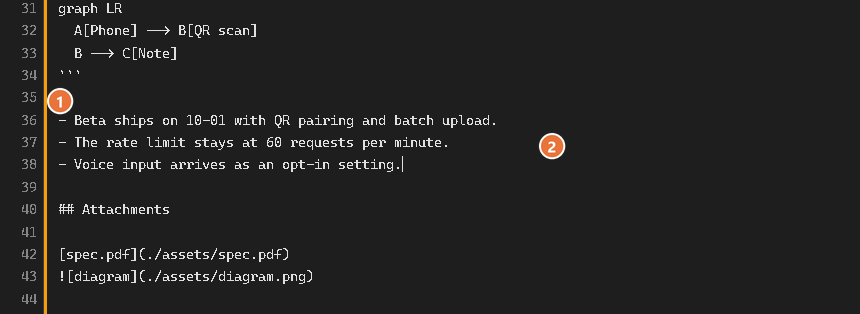
- Amber line on the left edge It shows that an agent result just changed the note. It disappears after the time you set
- Inserted text The agent's result, in place of the slot. Press Esc within the highlight time to restore the original slot
- Ghost Diff (the left-edge line): Right after a result is inserted, a 3 px amber line appears on the left edge of the editor. It spans the full height of the editor, so it does not mark only the changed lines.
- How long it shows: Set it with "Change highlight duration (ms) (Ghost Diff)" under Settings → Agent (default 4000 ms, 1000–10000). The line disappears when the time is up.
- Undo: During that time (the set time plus 1 second), press Esc and that slot alone reverts to your original instruction. Ctrl + Z undoes the last slot run the same way.
- Inline slots stay inline: If the slot had other text on its line, line breaks are removed from the result so it stays on one line.
- Results written below a line: Ghost Diff and the Esc revert belong to slots that are replaced by their result. A result written below a task line has no amber line.
Approval gates in recipes
A recipe such as [>> ... ] runs several steps in order. To put a human check before a risky step, set requires_approval_step on the recipe. The run pauses after that step, and a line like this is inserted into the note (the inserted text is Japanese in both UI languages):
- [ ] 次のステップ(実装コードを生成する)を実行する // approve- Review what you have so farChange
[ ]to[x] - Press Ctrl + EnterThe run continues. If you leave the box unchecked, it stays stopped there
Agent CLIs are installed separately
MD-Memo does not bundle any agent. Install the commands you intend to use — claude, codex, ollama, agy — and make sure they are on your PATH.
The built-in agy (Antigravity) agent starts with --dangerously-skip-permissions, so a slot using it edits files and runs commands without asking. Settings → Agent warns you when the selected agent is set up this way. To be asked first, override agy in agents.yaml (below) and remove that flag from its args.
Limits and details (error display, working directory and .env)
When a command cannot be found, the slot is replaced by an error like the one below (the inserted text is Japanese in both UI languages). Fix the cause, put the caret back in that slot and press Ctrl + Enter to run it again.
{{ ⚠ エラー: エージェント起動失敗: ... (再試行: Ctrl+Enter) }}- Working directory: The project root, found by walking up from the note until a folder that contains
.md-memo/,agents.yaml(oragents.yml/agents.json),AGENTS.md,skills/or.git/. If none is found, it is the note's own folder. - .env: If the project root has a
.envfile, its variables are passed to the agent as environment variables (only that file is read). - Tasks with a result below: The error is one line inside the result block, such as
[claude-code error: ...]. Fix the cause and press Ctrl + Enter on the task line to run it again.
Customizing it in agents.yaml
Every notation, agent, alias, recipe and snippet can be changed or added in agents.yaml.
- Click "Open agents.yaml"It is in Settings → Agent, in the "Agents (Delegate)" section. If the file does not exist, a commented template is created and opened
- Edit notations, agents, aliases, recipes and snippetsSave the file as UTF-8 without a BOM
- It takes effect on the next slot runIf the file has a syntax error, MD-Memo silently falls back to the defaults. If you changed notations (
slot_profiles/recipes), aliases or snippets, restart MD-Memo so the{{list, the palette list and short-word expansion see them (running a{{ @alias }}task and the command bar list already use the new file)
The first file found, from the top, is used (.yaml, .yml, .md and .json are all accepted):
<scraps folder>/.md-memo/agents.yaml(per-project settings)%APPDATA%\md-memo\agents.yaml(macOS:~/Library/Application Support/md-memo/agents.yaml)
Example and writing rules
version: 2
default_agent: claude-code
timeout_seconds: 180
hover_peek_enabled: true
ghost_diff_duration_ms: 4000

# 1. The CLIs to call. {instruction} becomes your prompt, {file} the note's absolute path.
agents:
  claude-code:
    command: "claude"
    args: ["--file", "{file}", "--prompt", "{instruction}"]
    description: "Claude Code"
  my-agent:
    command: "my-cli"
    args: ["--prompt", "{instruction}"]
    description: "Our in-house agent"
    aliases: ["mine"]   # {{ @mine ... }} calls my-agent

# 2. Notation-to-agent mapping. Only what you list here stays active.
slot_profiles:
  - trigger_open: "{{"
    trigger_close: "}}"
    name: "code"
    agent: "claude-code"
    system_instruction: "Skip any preamble and output only a runnable code block."

  - trigger_open: "<<"
    trigger_close: ">>"
    name: "review"
    agent: "my-agent"
    system_instruction: "Review the changes and report your findings as bullet points."

# 3. Recipes run several steps in sequence.
recipes:
  - trigger_open: "[>>"
    trigger_close: "]"
    name: "deep-research-and-code"
    description: "Research -> risk critique -> implementation"
    steps:
      - "Research the current official specification and best practices"
      - "Point out migration risks and breaking changes"
      - "Generate the implementation based on the above"
    requires_approval_step: 2
self_refine: true- Placeholders:
{instruction}is replaced by what you wrote in the slot,{file}by the current note's absolute path. If you never mention{instruction}, it is appended as the final argument. - Choosing delimiters: pick
trigger_open/trigger_closepairs that do not collide with ordinary Markdown syntax (#,*,-, and so on). - How overriding works: writing
slot_profilesorrecipesreplaces the defaults, so copy over any of the four built-in notations you still want.agentsbehaves differently: built-in agents you don't override are kept. - self_refine: set it to
trueand the recipe's first step runs a draft → self-critique → revise loop (up to two passes) before moving on. - aliases and snippets:
aliasesgives an agent extra names for{{ @name ... }}, andsnippetsadds your own ready-made tasks. Both are described under Auto Selector. - Save the file as UTF-8 without a BOM.
Suggest · Quick Actions (Ctrl+J)
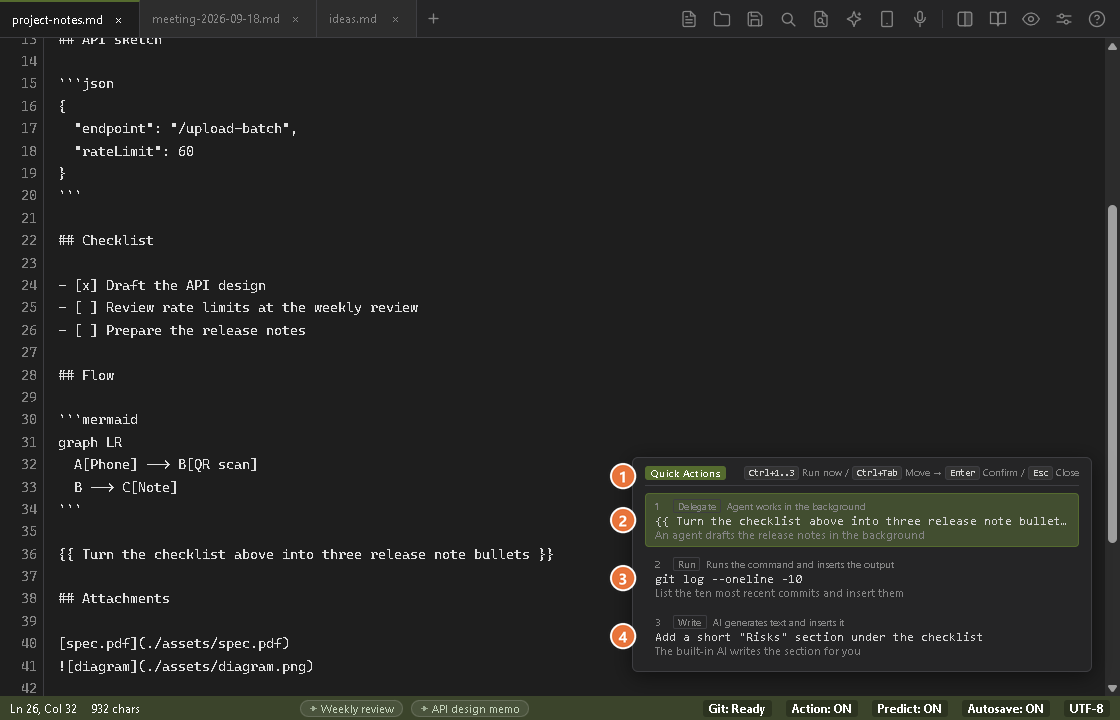
- Panel header Key hints: Ctrl+1..3 runs a suggestion at once, Ctrl+Tab moves the highlight, Enter confirms and Esc closes
- Delegate Hands the work to an agent that runs in the background
- Run Executes a command and inserts its output
- Write The built-in AI writes text and inserts it
The cards are chosen to be unlike each other in kind. Picking one takes you straight to that verb's entry point.
- Inserts a
{{ … }}or[? … ]slot and hands it to an agent
- Runs a shell command such as
git status
- Has the AI draft text
- Appears only when an external inference model is configured
With the built-in local rules (the default), you get Delegate and Run cards, typically in the order Delegate, Run, Delegate.
Cards that run a shell command always go through a safety check first. If it finds a destructive command such as rm, dd or mkfs, a write into a protected system directory, or a fork bomb, the card is not run and the reason is shown. It guards against known dangerous patterns, so read the command yourself before you accept it.
Limits and details (panel behavior, auto-suggest, badge)
- Hint line: While the panel is open it shows "Ctrl+1..3 Run now / Ctrl+Tab Move → Enter Confirm / Esc Close".
- A bare Enter: If you press Enter without first moving the selection with Ctrl + Tab, it is just a newline. No card runs, and the panel closes.
- It stays out of your typing: Bare digits, a bare Tab and Ctrl + Enter (the Auto selector's key, which also runs slots) are never taken by the panel.
- Auto-suggest: Besides Ctrl + J, the panel can appear on its own after a typing pause (on by default). To stop that, choose "Manual trigger only (suppress auto-popup, press Ctrl+J)" under Settings → Agent, in the "Suggestions (Quick Actions)" section. The delay before it appears is set there too.
- Changing the key: The shortcut itself can be reassigned under Settings → Shortcuts.
- Status bar badge: The "Action" badge shows the current mode, and each click cycles On → Manual → Off → On. It reads "Action: ON", "Action: Ctrl+J" (your configured key; Cmd+J on macOS) or "Action: OFF". It mirrors the two checkboxes under Settings → Agent → Suggestions (Quick Actions). While it is Off, Ctrl + J does nothing.
- Commands with no output: If a Run card (an
shcard) command succeeds but prints nothing,> (出力なし)is inserted so you can tell it ran. This applies to Quick Actions only (the command bar shows "(no output)" in its result tab). The inserted text is Japanese in both the English and Japanese builds. - Working directory: Run-card commands run in MD-Memo's own working directory. For example,
git status -sreturns the state of the folder where MD-Memo was started.
Limits and details (data that is sent)
- By default, suggestions come from the built-in local rules only. Nothing from your note leaves your machine.
- Data is sent only if you enter an API key (it goes to OpenRouter's fixed endpoint) or change the Base URL to something other than the OpenRouter default (it goes to
<Base URL>/predict). Then an external inference model (such as Jev) is queried. - What is sent is an excerpt around the caret: up to 1,500 characters before it and 500 after (about 2,000 in total).
- The Base URL and Model Name fields come pre-filled with
https://openrouter.ai/api/v1andjev-latest, but while the API key is empty, nothing is sent. - The safety check is the AST guardrail. The glossary explains these internal names.
Editor & Split Mode (Ctrl+\)
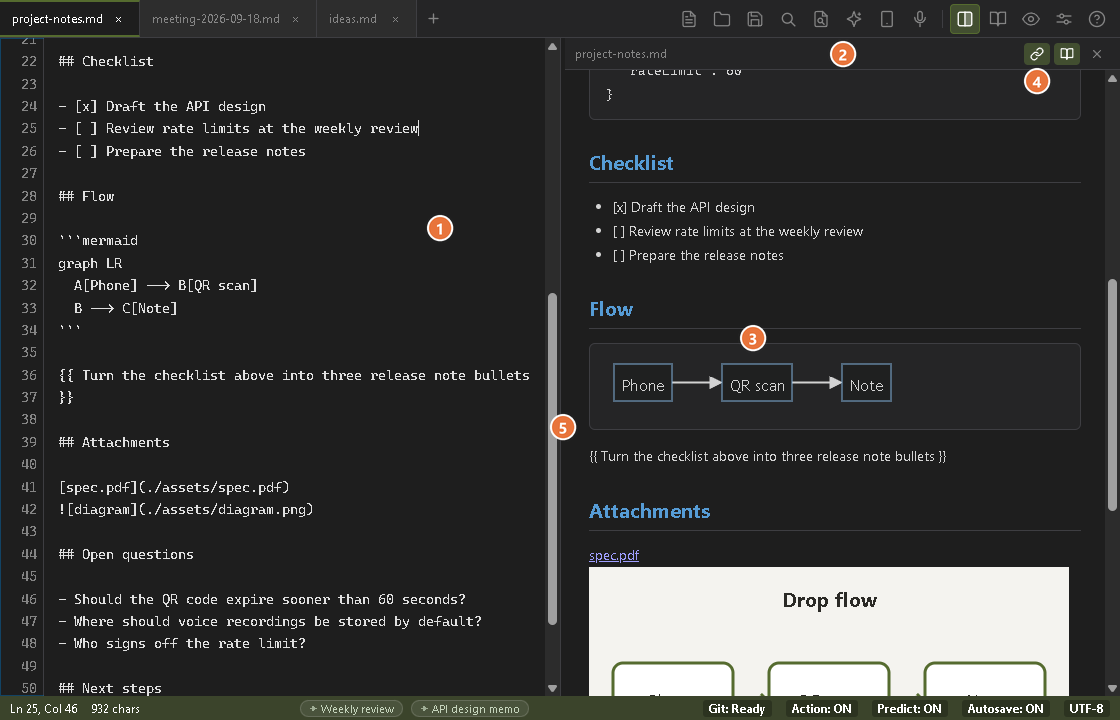
- Editor The Markdown source
- Preview header The note name and the pane buttons
- Mermaid diagram Drawn from the code block in the note
- Scroll sync Toggles whether both panes scroll together
- Divider Drag to resize the panes, double-click to reset to 50:50
- Switch to two panesClick the split icon in the header, or press Ctrl + \ (macOS: Cmd + \)
- Make the right pane a previewThe preview icon on the right pane shows the live HTML rendering
- Scrolling stays in syncScroll one pane and the other follows
To open only the preview to the side, use Ctrl + Alt + V (macOS: Cmd + Option + V).
File Links & Drag & Drop
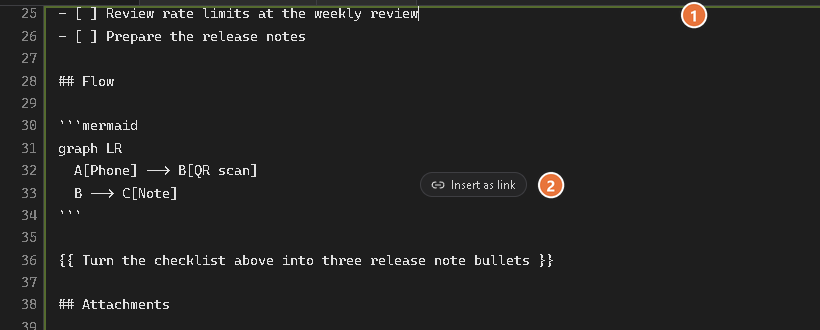
- Pulsing frame The editor is a drop target for the dragged file
- "Insert as link" badge Dropping inserts a Markdown link to the file. A file the app cannot reference by path is first copied into the note's assets folder
- Drag a fileBring it over the editor. The frame pulses and an "Insert as link" badge appears
- Drop it onto the textDropping onto the tab bar or the header still opens the file as a new tab, as before
- The link is insertedAt the caret:
for images,[name](...)for everything else. Several files give one link per line
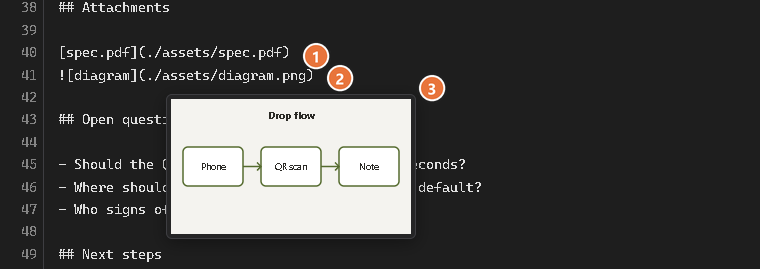
- File link Ctrl+click opens the file, and Alt+click shows it in the file manager
- Image link Point at it for 0.3 seconds to see a thumbnail
- Thumbnail A preview of the linked image
Limits and details
- Files are copied in: The embedded browser does not expose the original path of a dropped file, so MD-Memo copies the file (up to 25 MB each) into
./assets/next to the note and links to it relatively. The original location is not recorded. - Link format: Spaces and parentheses in the link are percent-encoded (
%20,%28,%29), so the Markdown stays valid. Ctrl + Click still opens the file normally. - Links that can be opened:
file://links, absolute paths and note-relative paths.http(s):andmailto:links get their normal handling, and any other scheme is refused. - Thumbnail: Its position is approximate.
Live Mermaid Diagrams & Image Rendering
```mermaid block is drawn right in the preview. You can also export it as a high-resolution PNG image.- Flowcharts, sequence diagrams and Gantt charts written in
```mermaidare supported - They are rendered as diagrams in real time in the preview
- Right-click a diagram and choose "Render Image..."
- It works with Gemini (Nano Banana 2 Lite) and exports a high-resolution PNG image
Limits and details (image settings)
- Choose the model, aspect ratio and resolution under "Image Generation (Mermaid & Infographics)" in Settings → AI Models.
- If the Gemini API key field is empty, the Vision key is used, then the Text key, in that order.
- The image is saved as
assets/diagram_<number>.png, andis inserted. Save the note first to get a relative link.
Parallel Daily Scrap Search (Ctrl+Shift+F)
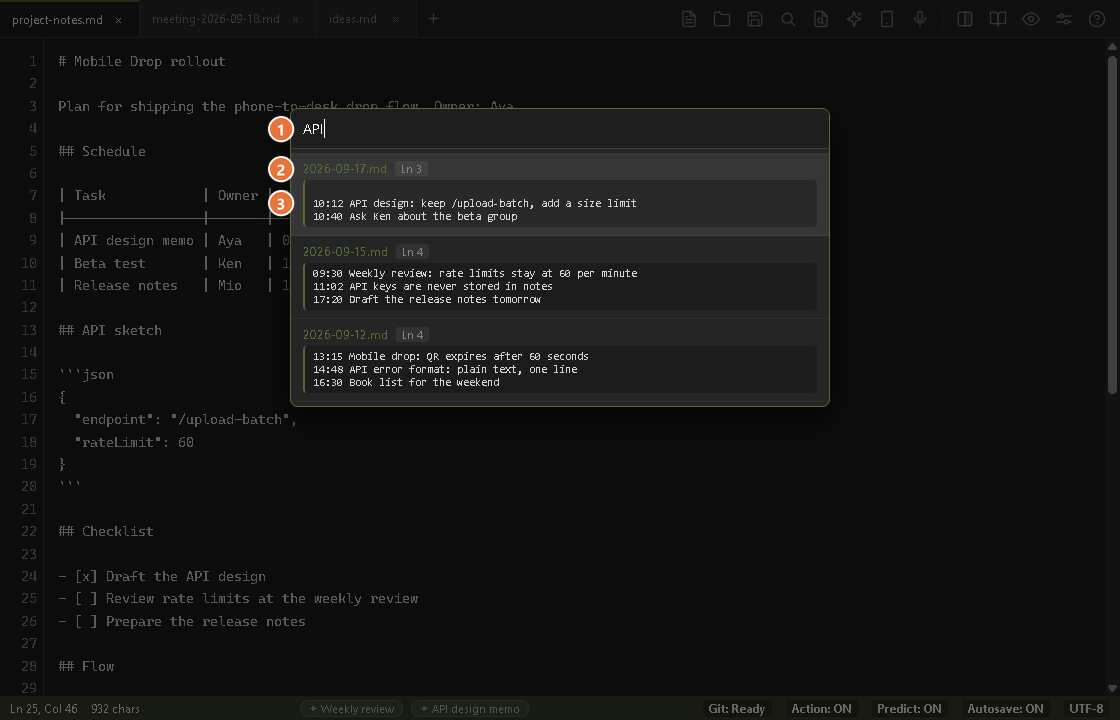
- Search box Searches every daily scrap as you type
- File name and line number Where the match is
- Matching line Shown with the line before and after it. Enter or a click opens the file at that line
- Open the search modalCtrl + Shift + F (macOS: Cmd + Shift + F)
- Type a wordIt searches across all past daily scraps
- Click a result lineYou jump straight to that line
Limits and details
It uses all available CPU cores (runtime.NumCPU()) to run a multithreaded, case-insensitive substring search (plain text, not a regular expression) across your historical scraps.
Mobile Drop · Send from your phone (Ctrl+Shift+U)
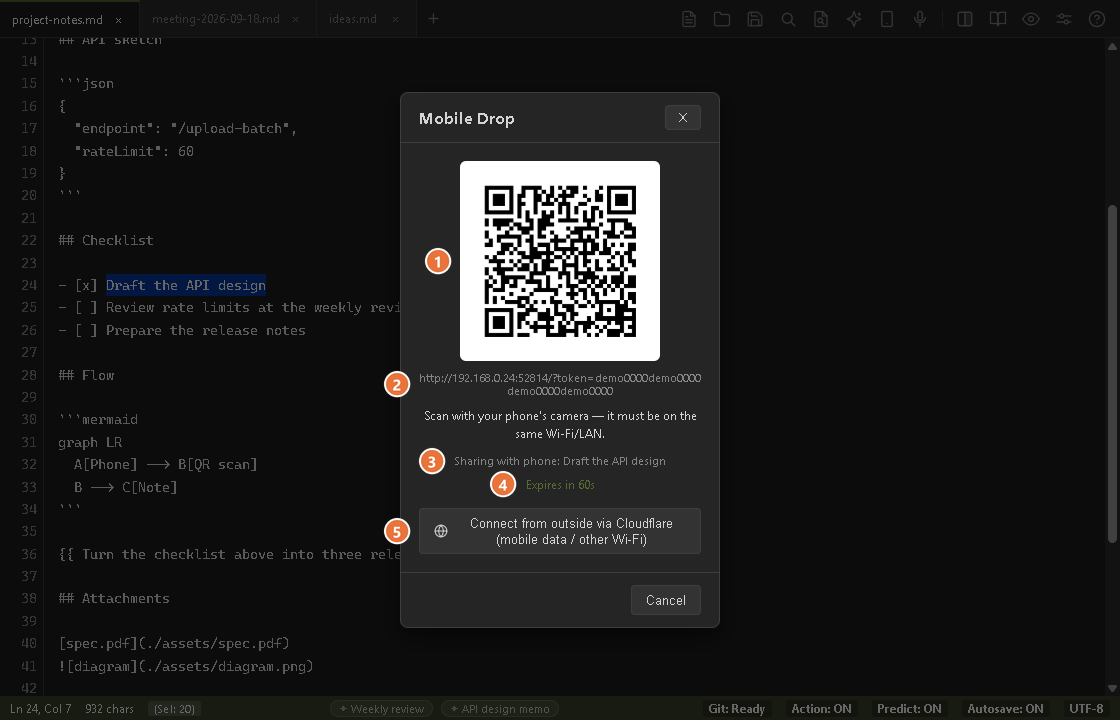
- QR code Scan it with the phone camera (phone and PC on the same Wi-Fi / LAN)
- Address The one-time address behind the QR code
- Sharing with phone The text selected in the editor is shown on the phone (the "Text from PC" card)
- Countdown Time until the idle timeout. When it runs out, the dialog closes and the address stops working (activity on the phone extends it)
- Switch to an outside connection An optional switch to a Cloudflare tunnel, for mobile data or another Wi-Fi
- Open the dialogClick the phone icon in the toolbar, press Ctrl + Shift + U (macOS: Cmd + Shift + U), or choose Mobile Drop in the Command Palette
- Scan the QR code with the phone cameraThe phone must be on the same Wi-Fi (the same LAN) as the PC. The address is also shown as text under the code, so you can type it in
- Fill the send trayAdd photos or files (up to 10 items, 60 MB total), a voice note and text, in any combination
- Press "Send all"There is only one button. An upload progress indicator shows while it sends
- It is appended to the noteThe dialog closes and the content is appended to the end of the active note. Each item gets its own heading:
## Mobile Drop [14:20:05] — <filename>
The page that opens on the phone
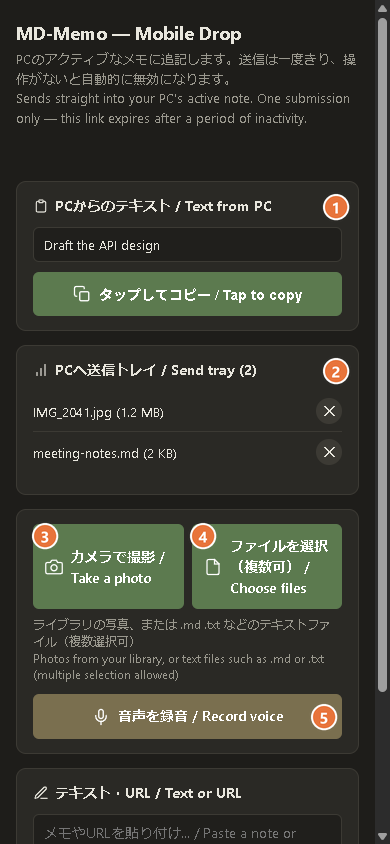
- Text from PC The text selected on the PC. Tap the button below it to copy it on the phone
- Send tray Everything you have added so far (a photo and a note file here). ✕ removes an item
- Take a photo Takes a photo with the phone camera
- Choose files Pick photos or text files from the phone (several at once)
- Record voice Opens the phone's own recorder. The recording is added to the tray and transcribed on the PC
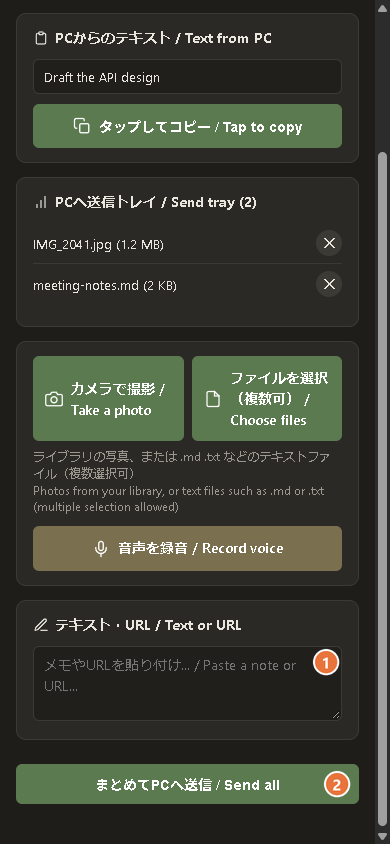
- Text or URL box Paste a note or a link to send it as text
- Send all Sends the tray and the text to the active note on the PC in one go (one submission per session)
| On the phone | What ends up in the note |
|---|---|
| Photos / files | Photos are transcribed to Markdown by the vision model. .md and .txt are added as they are; .html, .js, .json, .py and other code or config files are wrapped in a fenced code block. Shift_JIS text files are converted automatically. |
| Voice note | Transcribed the same way as Voice Input and added as text. |
| Text or URL | The text exactly as typed or pasted. A lone URL becomes a Markdown link. |
Where photos and voice notes go
- Photos: The same vision model as Ctrl + V image OCR (Settings → AI Models → Image OCR (Vision)) transcribes them to Markdown. The photo itself is not saved
- Voice notes: Transcribed the same way as Voice Input (the same Gemini model) and added as text
- A local (Ollama or LM Studio) vision model does OCR even without a key
- Whether the key is missing, the model is not supported, the transcript is empty, or there is an HTTP error or a timeout, the photo or voice note is not lost
- It is saved to
./assets/just like an image pasted with Ctrl + Shift + V, and the note gets a link plus a one-line reason - A toast tells you how many items were handled this way
Limits and details (the lines added when an item is saved, and where)
When an item is saved, one of these lines goes into the note, depending on the situation. These inserted lines are Japanese in both UI languages.
| Situation | Photo | Voice note |
|---|---|---|
| Nothing is configured |  and > 画像OCRをスキップし、画像として保存しました: <error> (設定 → AIモデル → 画像解析) |
[name](./assets/...) and > 文字起こしをスキップし、音声として保存しました: <error> (設定 → AIモデル → 音声入力) |
| Any other failure | > 画像OCRに失敗したため、画像として保存しました: <error> |
> 文字起こしに失敗したため、音声として保存しました: <error> |
- Where it is saved:
./assets/YYYY-MM-DD-HHmmss.<extension>, next to the note. If there is no saved note, the workspace folder; if that is missing too, the app data folder (then the link is afile://link). A name collision appends-2,-3. - If saving fails too: Only when saving to assets fails as well,
[Mobile Drop: <filename> の処理に失敗しました: <error>]is appended after that item's heading. The remaining items arrive normally.
Limits and details (what you can send, and size limits)
- Up to 10 photos or files, 60 MB in total.
- Per-item limits: an image 20 MB, an audio file 25 MB, a text file 2 MB. Any other binary file is refused.
Limits and details (the phone page and "Text from PC")
- Page layout: From top to bottom: the "Text from PC" card, the "Send tray" (each added item shows its name, size and a
✕to remove it), camera / file picker (several files) / voice recording, and the text box. There is only one send button. - "Text from PC": The text selected on the PC (or the clipboard text, if nothing was selected when the dialog opened) is shown with a one-tap copy button. It refreshes every 2 seconds and shows up to 64 KB.
- On the PC: The dialog shows it as "Sharing with phone: ...", truncated to 80 characters.
Choose a connection
- The phone and the PC must be on the same network
- Nothing leaves that network
- For voice notes, the phone's own recorder app opens
- Location is neither requested nor attached
- Press "Connect from outside via Cloudflare (mobile data / other Wi-Fi)" in the dialog
- It opens an account-free Cloudflare Quick Tunnel, and the QR code switches to a temporary
https://…trycloudflare.comaddress - For voice notes, you can record right in the page (HTTPS)
- Location can optionally be attached, once
- The transferred data passes through Cloudflare's servers
Limits and details (the Cloudflare tunnel)
- It needs
cloudflared. MD-Memo never downloads or installs it for you. - If it is missing, the dialog shows the install command (Windows:
winget install --id Cloudflare.cloudflared -e, macOS:brew install cloudflared) with a Copy button. Run it, then press the button again. - While the tunnel is up, the transferred data passes through Cloudflare's servers.
- About the 90 seconds: The tunnel's 90 seconds is an idle timeout. Activity on the phone re-arms it. It is not a fixed "valid for 90 seconds after it is issued" limit.
Limits and details (safety and limits)
- It exists only while the dialog is open. Opening it starts a small server on the PC. It stops after one submission, after 60 seconds without activity, or when you close or cancel the dialog. Opening the page on the phone, and any work on the phone (adding a file, recording, typing), all count as activity and reset that timer. So even a large batch does not trip the 60-second idle timeout.
- One submission per QR code. To send more, open the dialog again. The one-time token is checked before the request body is even read.
- Only someone with the code can send. The address contains a random one-time token, and a request without it is refused before anything is read.
- Photos and cloud models. If your vision model is a cloud service such as Gemini, photos are sent to that provider, exactly as when you paste an image with Ctrl + V. Even with no API key, the photo is not lost: it is saved as an image (see "Not set up, or it fails" above).
- Location is opt-in and tunnel-only. Only when connected through the Cloudflare tunnel (HTTPS), the phone may attach its location once, as a single one-time attempt. Only the first item's heading carries it:
## Mobile Drop [14:20:05] — <filename> (34.693, 135.502). Over plain LAN HTTP, location is never requested or attached.
Limits and details (how sending survives interruptions)
On a plain LAN connection, recording a voice note opens the phone's own recorder app. To keep the session alive meanwhile, the phone page works as follows.
- Just before handing over to the camera, the file picker or the recorder app, it asks the PC to keep the session open up to 120 seconds longer. The PC session normally ends after 60 seconds without activity, and the server caps such a request at 180 seconds.
- When you come back to the page, it pings the PC.
- A picked file is copied into memory right away, because recorder apps may still be writing to it or may revoke access.
- While files are being read, the Send button waits.
- If sending fails, the page checks whether the PC session is still alive. If it is, the page resends once automatically, and if that fails too it shows "network error - please try again".
- If the PC session has ended, it shows "the connection to the PC is gone (closed or timed out) - reopen Mobile Drop on the PC and scan the QR code again".
- Recording directly in the page, without opening a recorder app, needs the HTTPS Cloudflare tunnel.
If the page will not open on the phone
- Check that both devices are on the same Wi-Fi. Guest networks and some routers stop devices from talking to each other ("AP isolation"). A VPN on the PC or the phone can also get in the way.
- On Windows you may see a firewall prompt for MD-Memo the first time. Allow it on private networks.
- The QR code uses the address of the network adapter that carries your default route (virtual adapters such as WSL or Docker are skipped). If your phone is not on that network, use the Cloudflare connection above.
The toolbar icon can be hidden or moved under Settings → General → Toolbar & right-click menu. The shortcut and the Command Palette entry work either way.
Command Palette (Ctrl+Shift+P)
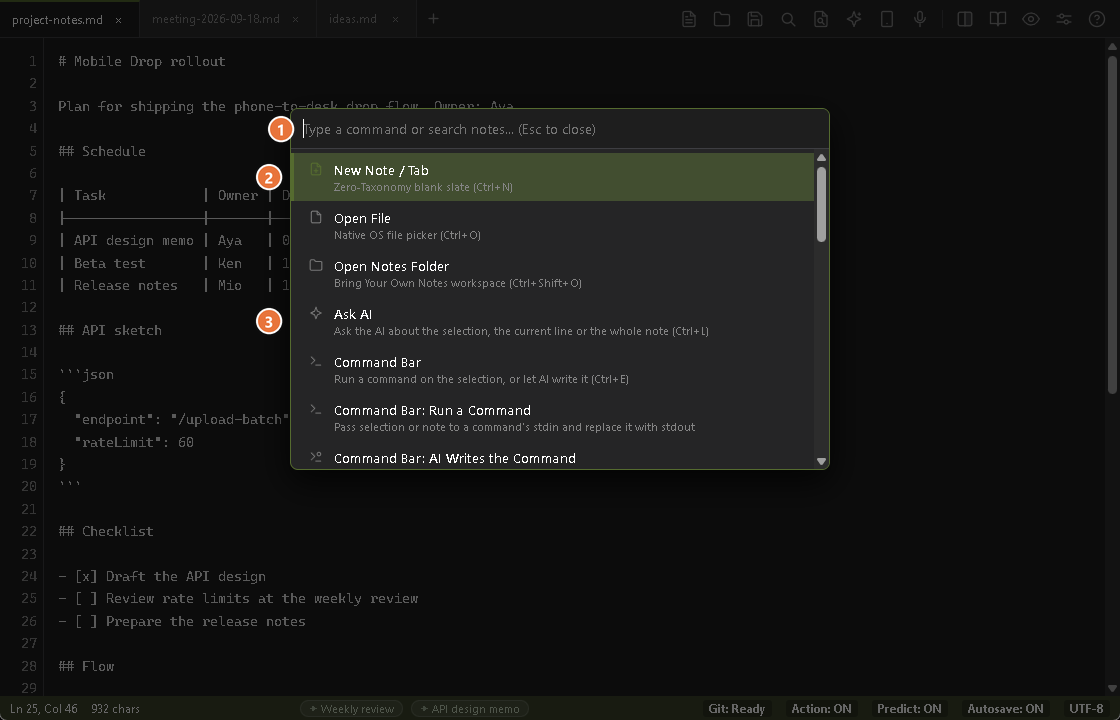
- Input field Type to filter commands and notes
- Highlighted command Press Enter to run it
- Description and shortcut Each command shows a one-line description and its assigned key
- Open the paletteCtrl + Shift + P (macOS: Cmd + Shift + P)
- Type to filterType part of a command name or a note title (substring match)
- Choose and runA command runs, and a note opens
Limits and details
- It searches the commands and the notes in the workspace folder you have opened.
- The AI and command entries are "Ask AI", "Command Bar" (opens in the mode you used last), "Command Bar: Run a Command" and "Command Bar: AI Writes the Command". The last two have no key by default.
- "Insert task snippet" opens the list of ready-made LLM, agent and command tasks at the caret. Insert one, then press Ctrl + Enter to run it (see Auto Selector).
- Matching is a plain substring match, not a fuzzy search.
- Settings are not searchable. Open the settings screen with Ctrl + , (macOS: Cmd + ,).
03 Settings Reference
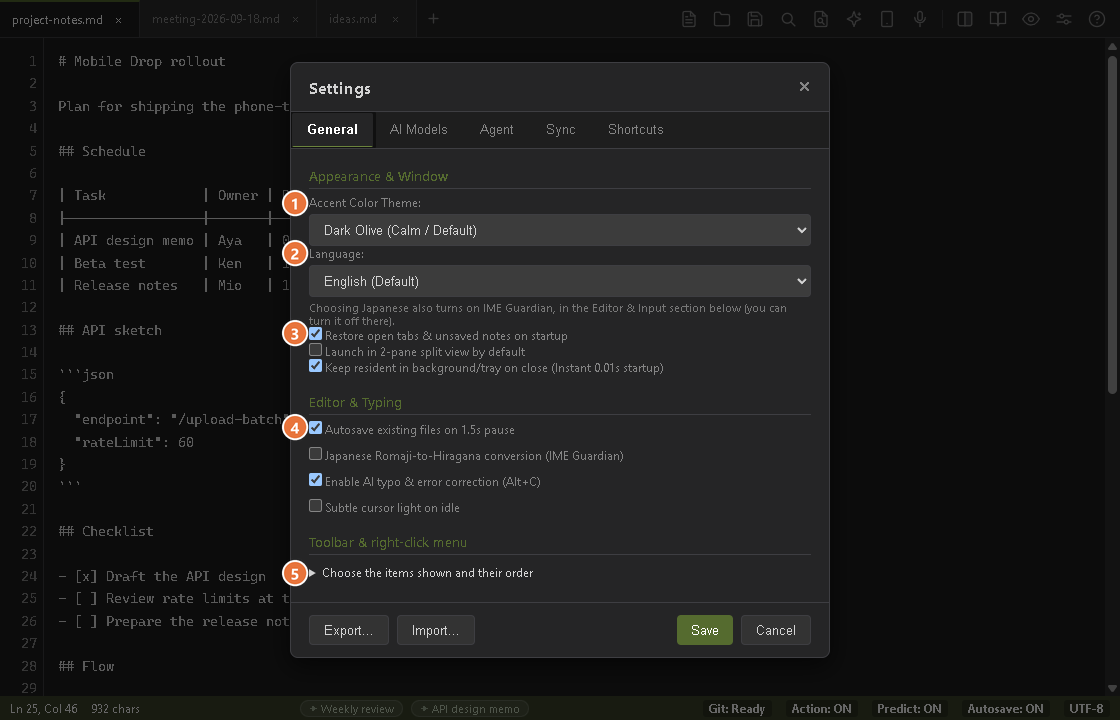
- Theme The accent color scheme
- Language The interface language: English or Japanese
- Startup and window Restore tabs and unsaved notes, start in split view, stay in the tray
- Editor and typing Autosave, IME Guardian, AI proofreading, cursor light
- Toolbar and right-click menu Choose the items shown and their order (see the steps below)
1. General Tab
| Setting | Default | Description |
|---|---|---|
| Accent Color Theme | Dark Olive | Choose between Dark Olive, VS Code Blue, Forest Teal, and Charcoal Monochrome. |
| Language | English / Japanese | Switch the UI language. |
| Restore Open Tabs | Enabled | Restores unsaved buffers and previous tabs upon application launch. |
| 2-Pane Split by Default | Disabled | Always launches in split view when checked. |
| Resident in Tray | Enabled (Windows) | On Windows, the close button keeps MD-Memo in the tray instead of quitting, and Ctrl+Alt+M brings it back in milliseconds. macOS has no tray: closing the window always keeps MD-Memo in the Dock, and this checkbox is disabled there with the hint "Not available on this platform yet; this setting currently has no effect." |
| Autosave on 1.5s Pause | Enabled | Silently saves existing files upon a 1.5-second typing pause. |
| IME Guardian | Enabled only if the system language is Japanese (Disabled by default on macOS) | Protects code blocks against IME full-width character leakage. On macOS the OS input source cannot be switched automatically yet, so it starts off there and Settings shows a hint saying so. |
| Enable AI typo & error correction (Alt+C) | Enabled | Turns the Alt + C proofreading command on or off. |
| Subtle cursor light on idle | Enabled | Shows a soft glow around the caret when typing stops. |
| Toolbar & right-click menu | Everything shown | Show, hide and reorder the toolbar icons and right-click menu items. See "Adjusting the toolbar and right-click menu" below for the steps. |
Adjusting the toolbar and right-click menu
- Open the sectionIn Settings → General, open "Toolbar & right-click menu" ("Choose the items shown and their order")
- Choose what to showTick the toolbar icons and right-click items you want. Use the arrows to reorder them within their group
- Changes apply at once"Cancel" undoes them. "Reset to default" restores the original layout
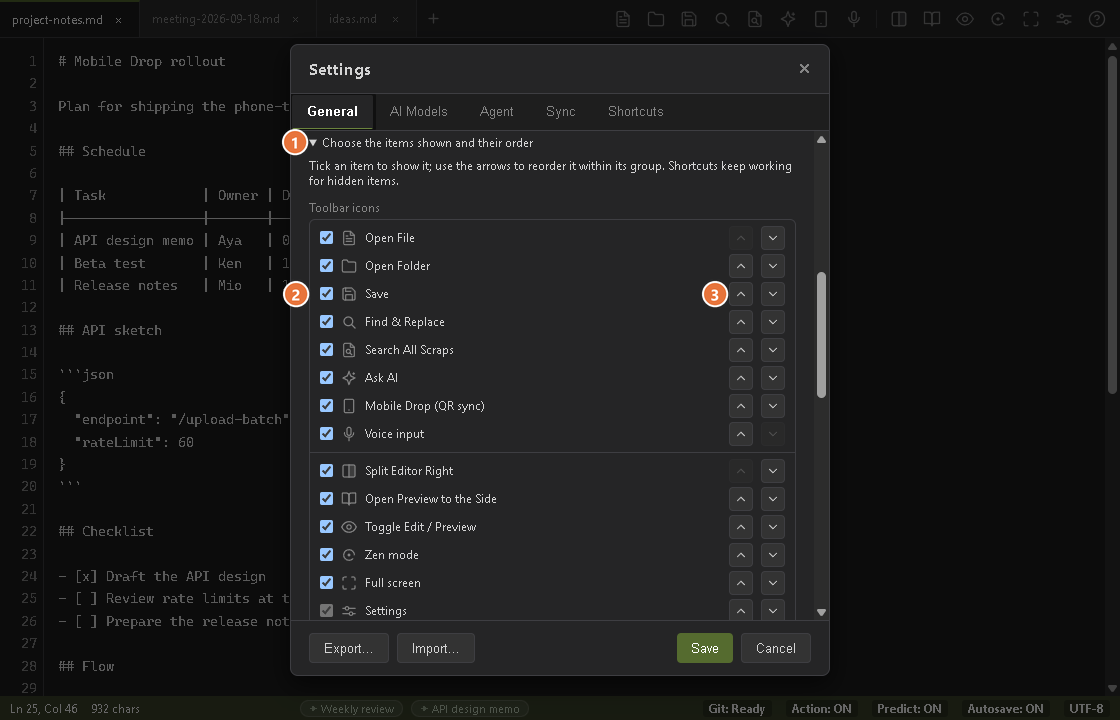
- Section title Choose the items shown and their order
- Checkboxes Tick to show, clear to hide (only the Settings icon always stays)
- Up and down arrows Move an item within its group
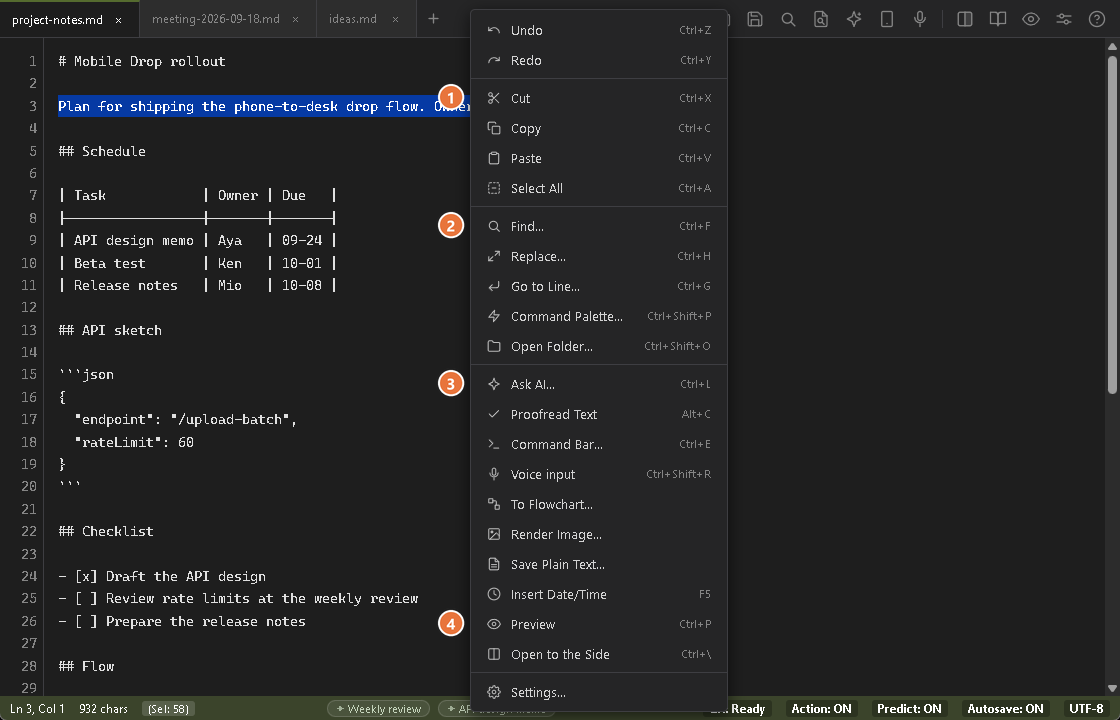
- Editing commands Undo, redo, cut, copy, paste, select all
- Navigation Find, replace, go to line, command palette, open folder
- AI and command bar Ask AI, proofread, Command Bar, voice input
- View Preview and open to the side. Which items are shown can be changed in Settings
- The Settings icon can be reordered but not hidden (it always stays, so you can get back to the settings screen).
- Items you hide can still be used with their shortcuts and from the command palette.
The Export... and Import... buttons at the bottom of the Settings dialog carry your settings, agent definitions and skills to another PC in one package (.mdmemopack). Details: 6. Export and Import Settings (Packages).
2. AI Models Tab
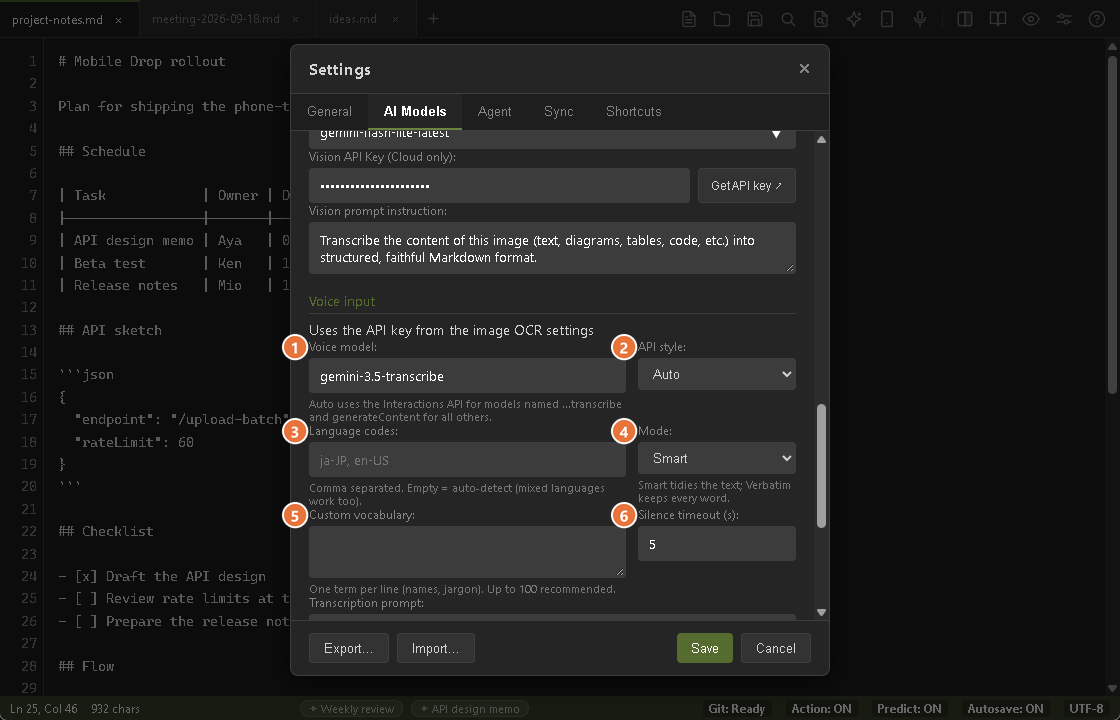
- Voice model The model used for transcription
- API style "Auto" picks the API from the model name, or you can force one
- Language codes Comma-separated. Empty means auto-detect
- Mode Smart tidies the text, and Verbatim keeps every word
- Custom vocabulary Names and jargon, one per line
- Silence timeout How many seconds of silence stop the recording automatically
- Feature → Which model setting it uses: the card at the top of the tab, showing which setting each feature reads. For example, Write (Ask AI) and Chat use the Text LLM, Ghost Text and Image OCR have their own settings, and Suggestions (Quick Actions) are configured on the Agent tab.
- Local AI (Ollama): a status badge with Start and Stop buttons for Ollama, plus Install Gemma 4, which installs Ollama if it is missing and pulls the
gemma4:e2bmodel. - Text LLM & AI CLI (Chat, Writing & CLI Agent): Base URL, model name, API key, and System Prompt. The protocol is detected from the URL and shown beneath it: Ollama, Gemini-compatible, or OpenAI-compatible.
- Inline Autocomplete (Ghost Text): its own URL, model, and key, plus the suggestion delay (default 500 ms; the settings screen allows 200–2000, but the effective minimum is 300 ms) and the maximum prediction tokens (default 30, range 10–100).
- Image OCR (Vision): the vision model and key, such as Gemini Flash Lite or Qwen 2.5 VL, plus a toggle "Automatically transcribe pasted images (Ctrl+V) using Gemini OCR" (on by default).
- Image Generation (Mermaid & Infographics): the model, aspect ratio, and resolution used by "Render Image...". If its Gemini API key is blank, it inherits the Vision key and then the Text key, in that order.
- Voice input: Right below the Image OCR (Vision) settings. For how to use it, see Voice Input. The settings are listed in the table below.
Voice input settings
| Setting | Config file key | Default | Description |
|---|---|---|---|
| Voice model | voice.model |
gemini-3.5-transcribe |
Suggestions: gemini-3.5-transcribe, gemini-2.5-flash, gemini-flash-lite-latest. gemini-3.5-transcribe-live (the streaming variant) cannot be used for recorded audio, and choosing it causes an error. |
| API style | voice.apiStyle |
Auto (auto) |
Auto / Interactions API / generateContent. Auto uses the Interactions API when the model name contains "transcribe", and generateContent otherwise. |
| Language codes | voice.languageCodes |
Empty | Comma-separated BCP-47 codes (for example ja-JP, en-US). Empty means auto-detect, which also handles mixed languages. Used only with the Interactions API. |
| Mode | voice.mode |
Smart (smart) |
Smart removes fillers and formats the text for reading. Verbatim (verbatim) transcribes word for word. Used only with the Interactions API. |
| Custom vocabulary | voice.customVocabulary |
Empty | One term per line (names, jargon). Up to 1000 terms, but about 100 works best. Used only with the Interactions API. |
| Silence timeout (s) | voice.silence_timeout_sec |
5 | 1–30. Recording stops by itself after this many seconds of silence. |
| Transcription prompt | voice.prompt |
Built-in instruction | Used only by generateContent-style models. |
| API key / Base URL | voice.apiKey / voice.baseUrl |
Empty | If empty, the Image OCR (Vision) key and Base URL are used. The settings screen has no separate fields for them, so a separate key is possible only by writing it in the config file directly. |
3. Agent & CLI Tab
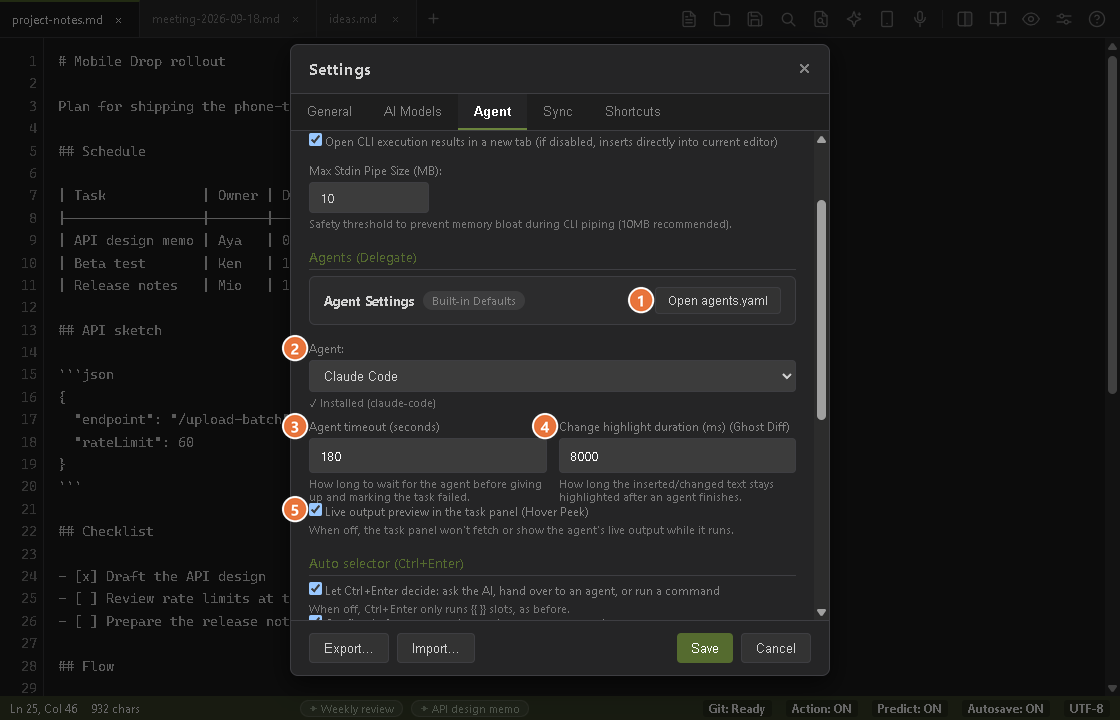
- Open agents.yaml Opens the file that defines agents and notations
- Agent The default agent, with a badge that shows whether its command is installed
- Agent timeout Seconds before a run is cut off
- Change highlight duration (Ghost Diff) In milliseconds
- Live output preview (Hover Peek) Shows the agent's latest output in the task panel
Commands (Run): settings for the command bar.
- CLI Model Name: the model that writes commands in the Command Bar's AI mode (Ctrl+E, then Tab). Leave it blank to inherit the AI Models tab.
- Open CLI execution results in a new tab: When on (the default), the command's output replaces the selection and the result also opens in a new tab. When off, no new tab opens, and with no selection the whole note is replaced by the output.
- Max Stdin Pipe Size (MB): Changing this has no effect. The limit for
cat log | md-memois fixed at 10 MB, to keep a huge file from spiking memory.
Agents (Delegate): settings for the agents your slots call.
- Open agents.yaml: opens the file that defines notations, agents (with their aliases), recipes and your own snippets. A commented template is generated if none exists yet; it explains
@name,aliasesandsnippets. - Agent: the default agent used when a notation does not name one. The Auto selector also uses it when a line looks like a job for an agent. The list is built from the
agents.yamlcurrently loaded. - Agent timeout (seconds): how long a run may take before it is cut off (default 180 s, range 10–600 s). If an
agents.yamlalready exists (even one created by "Open agents.yaml"), the file's value wins and this field is not used. - Ghost Diff highlight time: how long the amber line shows on the left edge of the editor right after a result lands (default 4000 ms, range 1000–10000). You can undo with Esc during that time and for 1 second after it. The settings screen labels it "Change highlight duration (ms) (Ghost Diff)".
- Hover Peek: shows the agent's latest output line in the task panel.
Auto selector (Ctrl+Enter): settings for the Auto selector. This group sits between "Agents (Delegate)" and "Suggestions (Quick Actions)".
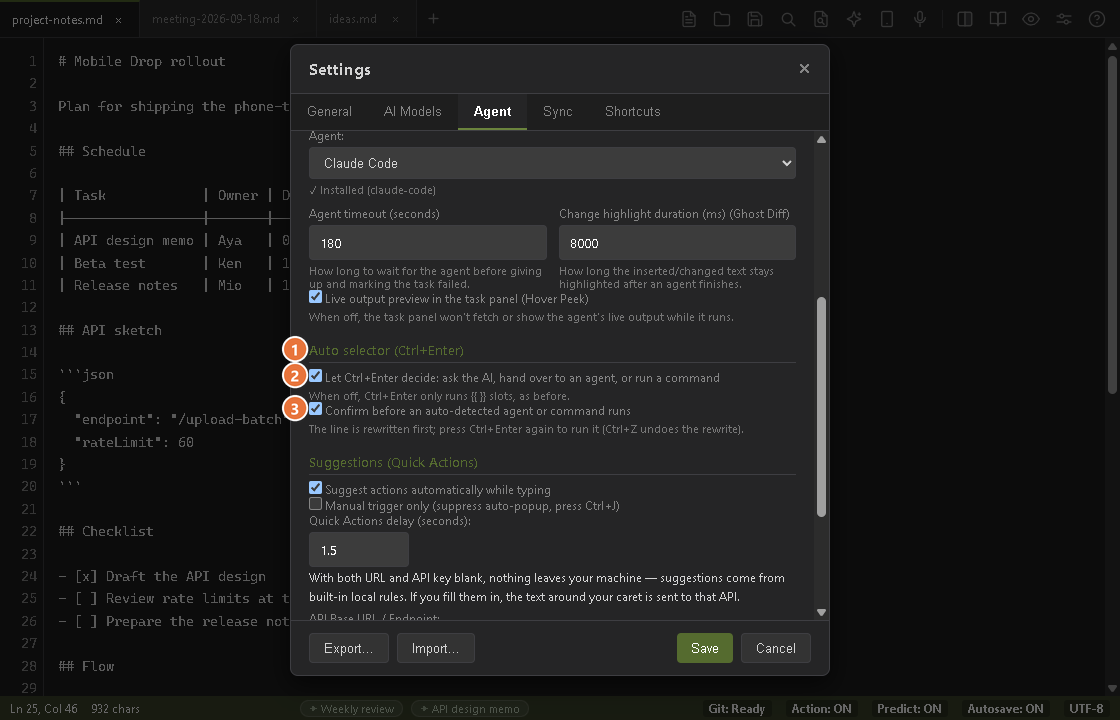
- Auto selector group Between Agents (Delegate) and Suggestions (Quick Actions)
- Let Ctrl+Enter decide On by default. When off, Ctrl+Enter only runs
{{ }}slots, as before - Confirm before an auto-detected agent or command runs On by default. The line is rewritten first, and a second Ctrl+Enter runs it
- Let Ctrl+Enter decide: ask the AI, hand over to an agent, or run a command: on by default (config key
autoSelector.enabled). When off, Ctrl+Enter only runs{{ }}slots, as before. A task you wrote yourself ([[ @llm ... ]],[[ $ ... ]],{{ @agent ... }}) still runs with Ctrl+Enter; only the guessing stops. - Confirm before an auto-detected agent or command runs: on by default (
autoSelector.agentConfirm). The line is rewritten first; press Ctrl+Enter again to run it (Ctrl+Z undoes the rewrite). When off, an agent or a command runs right after the rewrite. An AI instruction always runs at once. - Both settings travel with the "Agent & Quick Actions" section of a settings package. A config that has no such group gets the defaults (both on).
Suggestions (Quick Actions): settings for Quick Actions (Ctrl+J).
- Suggest actions automatically while typing: whether cards appear on their own after a pause.
- Manual trigger only (suppress auto-popup, press Ctrl+J): turn off automatic suggestions and show cards only when you press Ctrl+J.
- Quick Actions delay (seconds): how long a pause has to be before cards appear.
- API Base URL / Model Name / API Key: the endpoint used to generate candidates. Leave the API Key empty and the Base URL at its default (
https://openrouter.ai/api/v1, modeljev-latest) to use the built-in local inference; nothing is sent until you enter a key or change the URL.
4. Sync Tab (Git & Scraps)
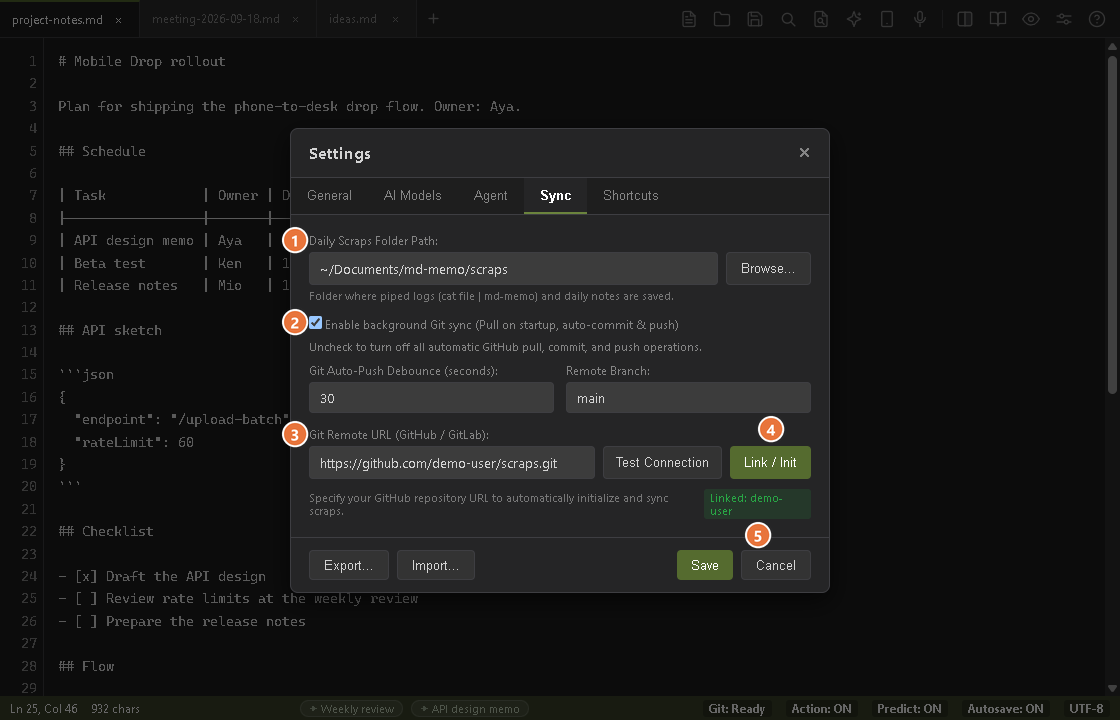
- Daily scraps folder The folder where scraps are saved
- Background Git sync Switch it on or off
- Git remote URL The URL of the scraps repository
- Link / Init Connects the folder to the remote
- Repository status badge Shows the current Git state
- Daily Scraps Folder: Path where
cat file | md-memoand daily notes reside. Use Browse... to pick it. Can point directly to an Obsidian vault or a Dropbox folder. - Enable background Git sync: Runs
git pull --rebaseon launch, then runsgit add/commit/pushin the background once you stop editing. It works when the scraps folder is a Git repository. A remote is not required, but without one the push fails. - Git Auto-Push Debounce (seconds): How long to wait after the last edit before pushing (default 30, range 5–3600).
- Remote Branch: The branch to sync with (default
main). - Git Remote URL, Test Connection, and Link / Init: Enter the URL of an empty GitHub repository (
https://github.com/user/scraps.git), click Test Connection to check access, then click Link / Init. It runsgit initif needed, setsorigin, makes an initial commit, and pushes withpush -u.
Git sync runs git add ., commit and push in the scraps folder. An .env or .md-memo/agents.yaml kept there is committed too, so do not keep secrets in that folder.
5. Shortcut Cheatsheet
| Action | Windows | macOS |
|---|---|---|
| Global Summon (bring to front; it does not hide the window) | Ctrl + Alt + M | Option + Cmd + M |
| High-Speed Scrap Search | Ctrl + Shift + F | Cmd + Shift + F |
| Command Palette | Ctrl + Shift + P | Cmd + Shift + P |
| Ask AI | Ctrl + L | Cmd + L |
| AI Proofreading & Correction | Alt + C | Cmd + Shift + C |
| Suggest Quick Actions | Ctrl + J | Cmd + J |
| Command Bar (opens in the mode you used last) | Ctrl + E | Cmd + E |
| Mobile Drop (send from your phone via QR) | Ctrl + Shift + U | Cmd + Shift + U |
| Auto selector / run a slot (fixed key) | Ctrl + Enter | Cmd + Enter |
| Toggle Task Panel | Alt + T | Option + T |
| Split Editor Right | Ctrl + \ | Cmd + \ |
| Preview to the Side | Ctrl + Alt + V | Cmd + Option + V |
| Special Paste (rich HTML → Markdown) | Ctrl + Shift + V | Cmd + Shift + V |
| Voice Input | Ctrl + Shift + R | Cmd + Shift + R |
| Open Link | Ctrl + Click | Cmd + Click |
| Reveal Link (Explorer / Finder) | Alt + Click | Option + Click |
| Zen Mode | Shift + F11 | Ctrl + Cmd + Z |
| Accept Ghost Text (Word) | Ctrl + → | Option + → |
| Insert Date / Time | F5 | Cmd + Shift + I |
The keys "Command Bar: CLI mode" and "Command Bar: AI mode" have no default key, and you can assign them here. Ctrl + K is not used by default either, so it is free to assign.
Reassigning a shortcut (Settings → Shortcuts)
- AssignClick the key button for a row, then press the combination you want. While it records, the hint reads "Press keys to set · Backspace to clear · Esc to cancel"
- If it is already usedA confirmation appears: "Already assigned to "<action>". Overwrite?" Choose "OK" (Enter) to move it (the other action becomes "Not Set"). "Cancel" or Esc changes nothing
- To leave it unassignedWhile recording, press Backspace (or Delete) and the action becomes "Not Set" and does nothing. Esc cancels the recording. "Reset to Defaults" restores every default key
When checking for duplicates, Ctrl and Cmd are treated as the same key.
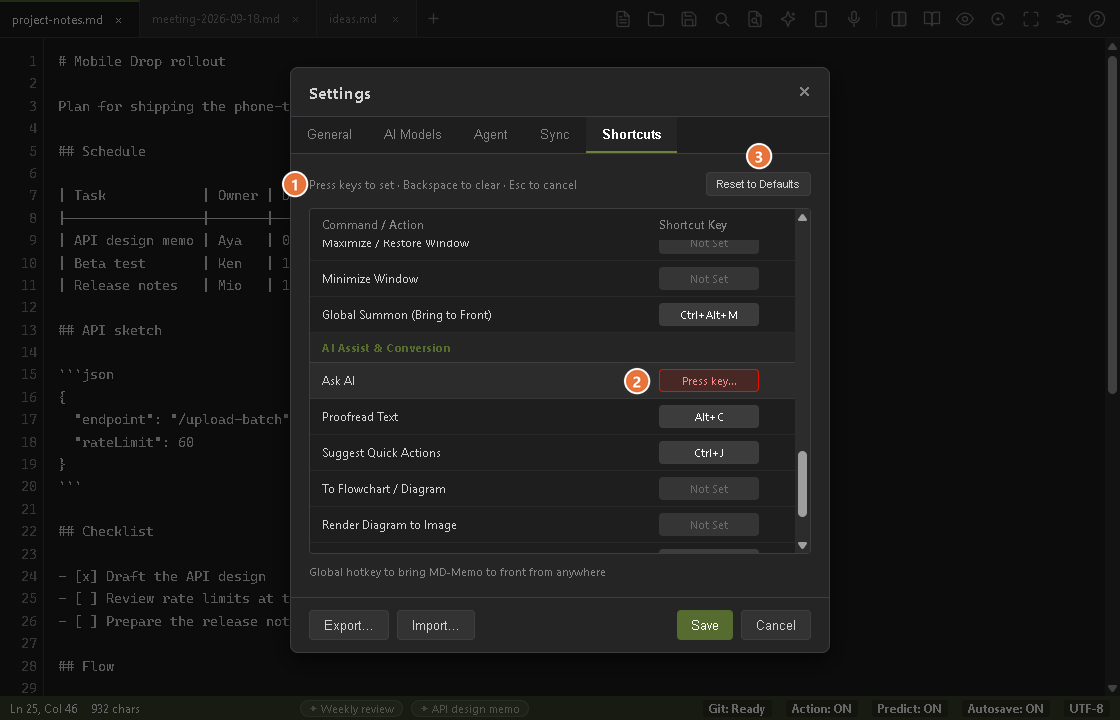
- Hint line Press the new keys. Backspace clears and Esc cancels
- Row being recorded The button shows "Press key..." until you press a key combination
- Reset to Defaults Puts every key back to its default
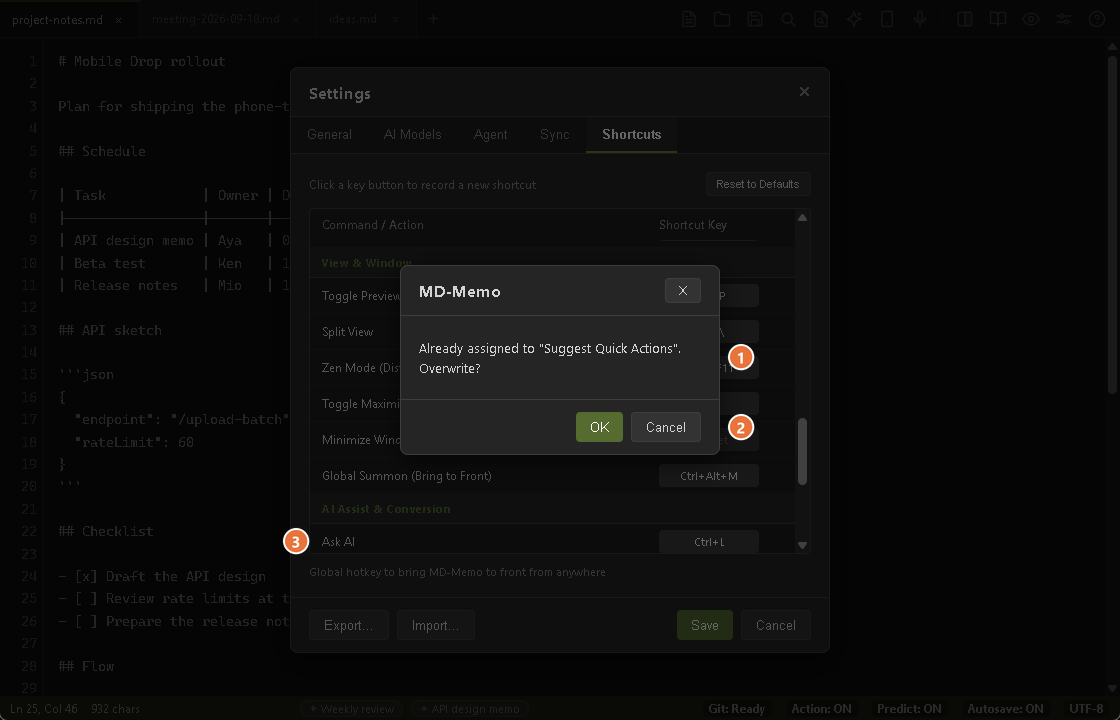
- Confirmation message It names the action that already uses the key, here "Suggest Quick Actions", and asks whether to overwrite it
- OK / Cancel "OK" (Enter) overwrites, and "Cancel" (Esc) keeps the current assignment
- The action being reassigned Here, Ask AI. This row's button was in the recording state
Reserved keys that cannot be assigned
The app uses the combinations below itself. If you try to assign one, you get the message "<combo>" is reserved by the app and can't be assigned.
| Platform | Keys that cannot be assigned |
|---|---|
| Windows / Linux | Ctrl + Tab Ctrl + , F11 Ctrl + Shift + V (special paste) Ctrl + Alt + V (preview to the side) Alt + T (task panel) Ctrl + → (accept a ghost-text word) Ctrl + Enter (also with Shift or Alt added; the Auto selector and slots) Ctrl + C Ctrl + V Ctrl + X Ctrl + A Ctrl + Z Ctrl + Shift + Z (redo) Ctrl + Y |
| macOS | Ctrl + Tab Cmd + , Cmd + Q Cmd + H Cmd + Option + H Cmd + M Cmd + Z Cmd + Shift + Z Cmd + X Cmd + C Cmd + V Cmd + A Cmd + Tab Cmd + Space Cmd + Shift + V Cmd + Option + V Option + T Cmd + → Cmd + Enter (also with Shift or Option added) |
Other fixed keys that are not in the settings list
- Ctrl + Enter: The Auto selector's key (see Auto Selector). It runs the task or slot under the caret, or does what the current line asks for. Variants with Shift or Alt added are treated the same way. That is why the default for "Insert Line Below" is Shift + Enter (Shift + Alt + Enter for "Insert Line Above").
- Ctrl + Click / Alt + Click: Open a link / show the link's location.
- Esc: Discards a voice recording.
- Special paste (Ctrl + Shift + V) is fixed and cannot be changed. The voice input key can be changed.
On macOS, use the corresponding keys from the table above.
6. Export and Import Settings (Packages)
.mdmemopack file and carry it to another PC. Use Export... and Import... at the bottom of the Settings dialog. API keys are left out at firstExport (Settings → Export...)
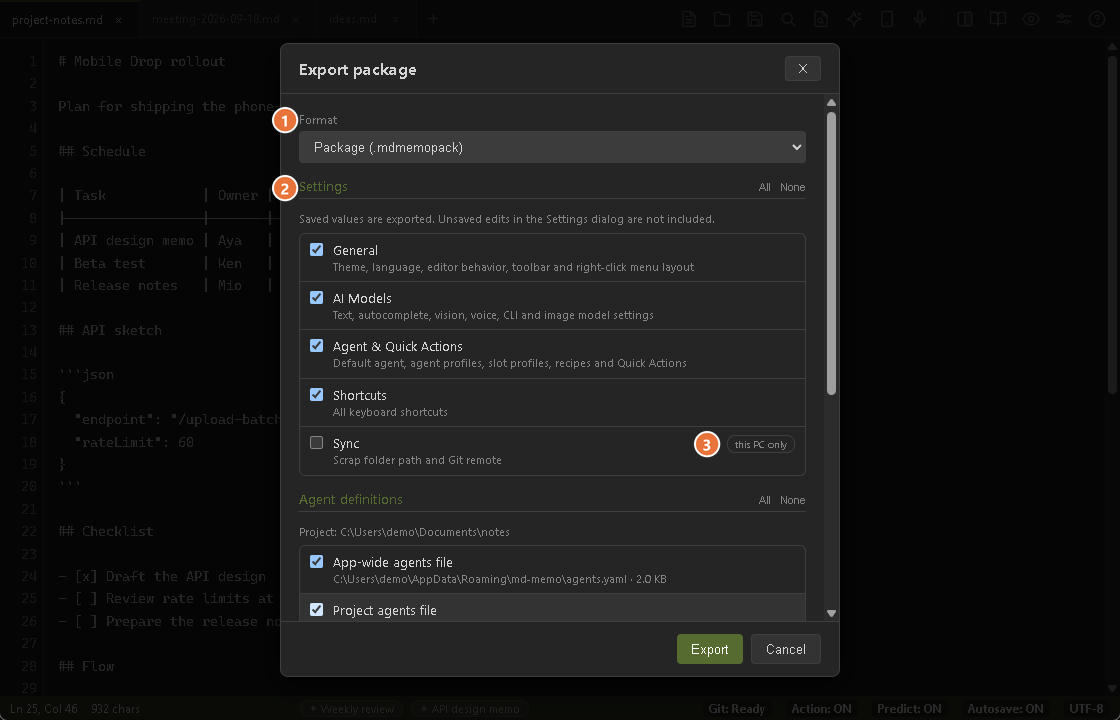
- Format A package (.mdmemopack), or a plain JSON file with the settings only
- Settings Tick one box per section; All and None (top right) switch them all at once
- Sync Marked "this PC only" and unticked at first, because the scrap folder path and similar values differ from PC to PC
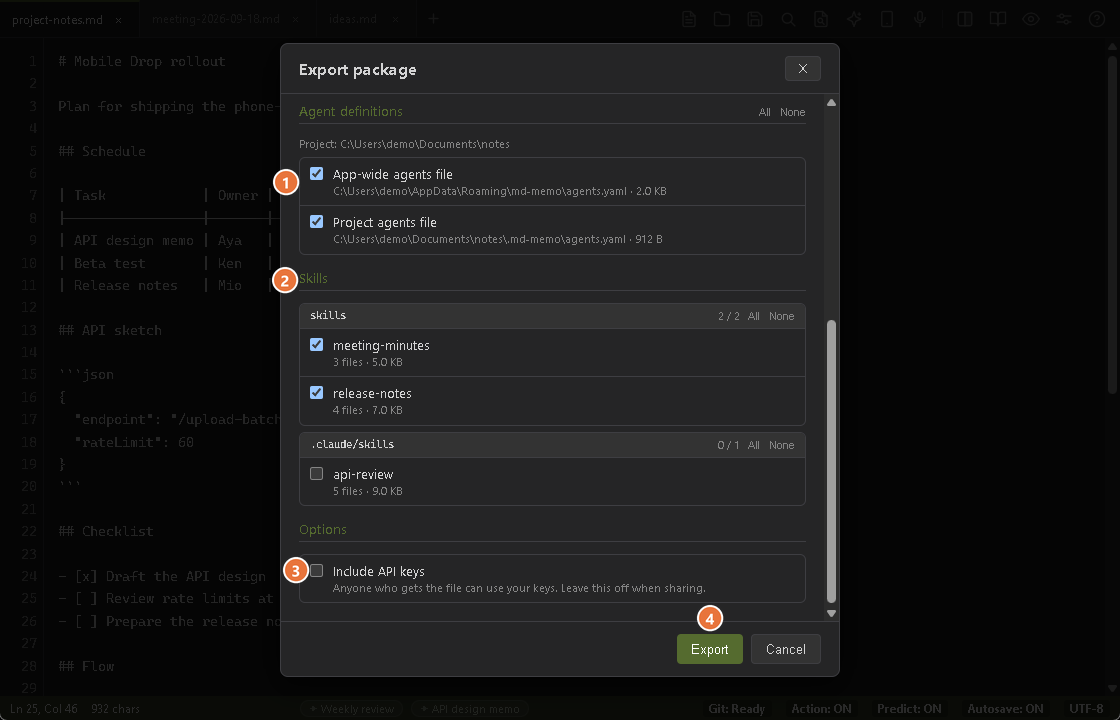
- Agent definitions The app-wide and the project agents file, with their paths; ticked at first
- Skills Only the skills of the current project, grouped by folder; none are ticked at first
- Include API keys Off at first; if you turn it on, anyone who gets the file can use your keys
- Export Asks where to save the package
- Click "Export..."At the bottom left of the Settings dialog; "Export package" opens
- Choose what goes inTick settings sections, agent definitions and skills; Sync and the skills start unticked
- Leave "Include API keys" offSo the file you hand over carries no keys; turn it on only to move to your own other PC
- Click "Export"Pick where to save;
md-memo-YYYYMMDD.mdmemopackis written and a summary is shown
Import (Settings → Import...)
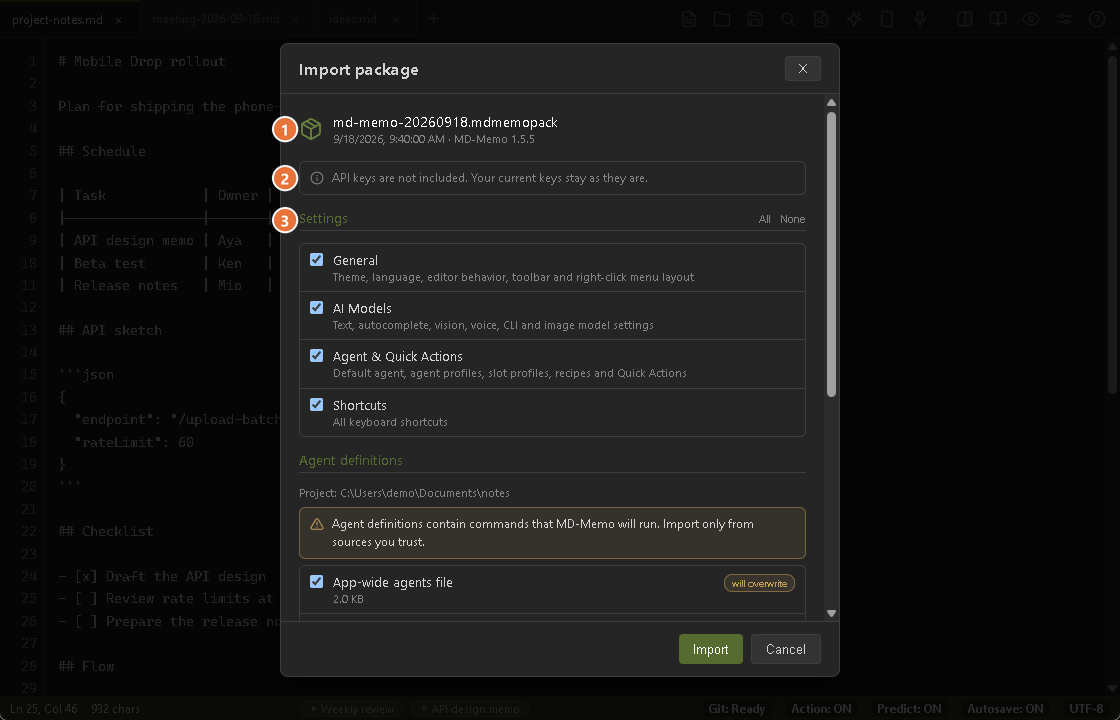
- The package File name, creation date and the MD-Memo version that wrote it
- API key notice "API keys are not included" means your current keys stay as they are; a package with keys shows a warning instead
- Settings Only the sections the package holds; tick what you want to apply
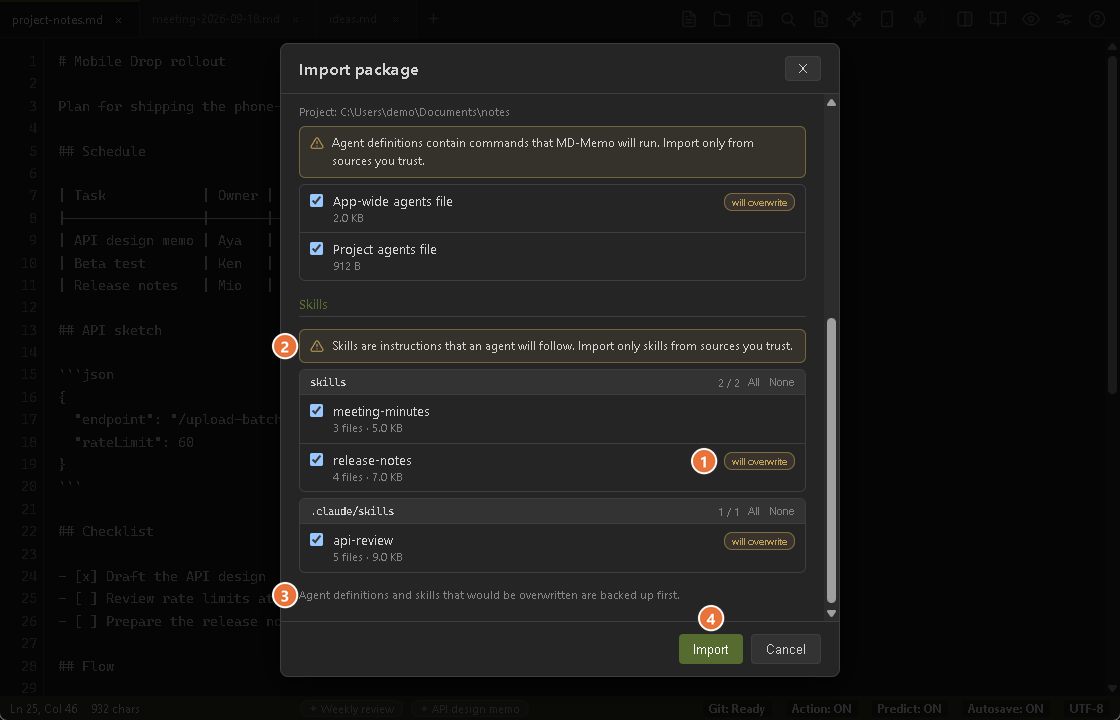
- Will overwrite Something with the same name already exists and will be replaced (it is backed up first)
- Skills warning Skills are instructions an agent will follow; import only skills from sources you trust
- Backup note Agent definitions and skills that would be overwritten are backed up first
- Import Applies only what is ticked
- Click "Import..." and pick the fileA
.mdmemopack; an older settings JSON file works too - Check the contentsItems marked "will overwrite" replace what you have; if the package's API key fields are empty, your current keys are kept
- Tick what to importUntick agent definitions and skills from anyone you do not trust
- Click "Import"Settings apply at once (some need a restart); agent definitions and skills are used from the next agent run
- Settings: General, AI Models, Agent & Quick Actions, Shortcuts, Sync, Other (chosen per section; the Auto selector settings are part of Agent & Quick Actions)
- Agent definitions: the app-wide and the project
agents.yaml - Skills: those in the current project's
skills,.claude/skills,.gemini/skillsand.codex/skills
- API keys: only when you tick "Include API keys"
.envfiles: the project's.envis never packaged- Global skills: skills in your home folder cannot be chosen
- Your notes: a package holds only settings, agent definitions and skills
Limits and details (secrets, backups, size limits, what "project" means)
API keys and other secrets
- With "Include API keys" off, the value of every setting whose name contains
apikey,api_key,api-key,token,secret,passwordorpasswdis emptied. A Git remote URL loses itsuser:password@part. - In agent definitions, values of the same kind under
env:are emptied (comments and layout are kept). If that cannot be done safely, the file is included unchanged and a notice says it may still contain secrets; check before you share it. - The number of emptied values is shown on the export result screen.
After you import
- Settings are merged into the running app and saved on the spot; theme, language, toolbar and shortcuts switch at once. Sections you did not tick stay as they are.
- Agent definitions and skills are written by MD-Memo itself. A package cannot be imported by editing
config.jsonby hand, because the running app owns that file. - Targets: the app-wide agent definitions go to
%APPDATA%\md-memo\agents.yaml(macOS:~/Library/Application Support/md-memo/agents.yaml), the project's to<project>/.md-memo/agents.yaml, skills to<project>/<folder>/<name>. An agents file that does not parse is skipped with a reason. - Whatever would be overwritten is first copied to
%APPDATA%\md-memo\pack_backups\<date-time>\(macOS:~/Library/Application Support/md-memo/pack_backups/). That folder is outside the project, so skill folders stay clean. The result screen shows the location. - An older settings JSON (one file with all settings) can be imported too; it covers settings only and may contain API keys. Choosing "JSON (settings only)" as the export format writes the same kind of file.
- Some settings take effect after you restart MD-Memo; the result screen says so.
What "project" means
Starting from the folder of the open note (for an unsaved note: the opened folder, else the scraps folder), MD-Memo walks up to the first folder that contains .md-memo, agents.yaml, AGENTS.md, skills or .git. The home folder is never treated as a project (so global skills are never carried away). If no project is found, project items show "needs a project" and cannot be ticked.
Limits and safety
- A package can be up to 50 MB and 3000 files; one file up to 10 MB, 100 MB in total after unpacking. Settings are limited to 2 MB and one agents file to 1 MB. A skill over the limits is left out of the export with a notice.
- Not packaged from skill folders:
.envand.env.*files (templates such as.env.exampleare included),.git,node_modulesand__pycache__folders, and symbolic links. - Refused on import: unsafe paths (
.., absolute paths, drive letters and the like), encrypted or damaged files, and packages from a newer version. Files not listed in the manifest are ignored. - Skills are instructions an agent will follow, and agent definitions contain commands MD-Memo will run. Import only from sources you trust.
04 Power User & Hackers Manual
UNIX Terminal Pipe
| md-memo and it is appended to the end of today's scrap. No setup needed
It reaches the running instance in milliseconds and is appended to the end of today's scrap (scraps/YYYY-MM-DD.md) with a timestamp and the command name. The window comes to the front automatically.
# Pipe a command's output straight into your notes
cat build.log | md-memo

# Record a curl result directly in your notes
curl -s https://api.github.com/zen | md-memo
The pipe input limit is fixed at 10 MB.
JSON-RPC 2.0 API Specification
127.0.0.1 and send newline-delimited JSON-RPC 2.0 requests to control MD-Memo.- Read the connection detailsStartup writes
ipc-session.json(Windows:%AppData%\md-memo\, macOS:~/Library/Application Support/md-memo/). It holds{pid, port, token, started_at} - Open the socketPort 49152 is preferred, but if it is busy a random free port is used instead. Always read the port from this file
- Send requestsSend newline-delimited JSON-RPC 2.0 requests
| Method | Params | Description |
|---|---|---|
buffer.get |
{"tab_id": "..."} |
Retrieve the content, hash (first 16 hex characters of the SHA-256), generation index, and line count. Omit tab_id for the active tab. Only buffer.get, buffer.get_selection and buffer.replace_selection accept tab_id. |
buffer.set |
{"content": "...", "expected_hash": "...", "expected_generation": 12} |
Replace the whole buffer. Supports optimistic locking (a conflict error if expected_hash or expected_generation does not match the current value) and preserves the undo history. It always acts on the active tab of the primary pane, and tab_id is ignored. |
buffer.append |
{"content": "\n- [ ] New Task"} |
Append text to the end of the current buffer. Always acts on the active tab of the primary pane. |
buffer.replace |
{"start_line": 1, "start_col": 1, "end_line": 2, "end_col": 1, "content": "...", "expected_hash": "..."} |
Replace only the given line and column range. Add expected_hash to detect conflicts (expected_generation is accepted but not checked here). Always acts on the active tab of the primary pane. |
buffer.get_selection |
{"tab_id": "..."} |
Get the selected text and its start and end positions (UTF-16 offsets). If nothing is selected, it returns error -32003 (no active selection). |
buffer.replace_selection |
{"content": "...", "tab_id": "..."} |
Replace the selection (as a single undo step). The selection is read again to check it, so if it changed after you read it you get conflict error -32001, and if nothing is selected you get -32003. |
tab.list |
{} |
List all open tabs and which one is active. |
tab.switch |
{"tab_id": "tab_123"} |
Switch focus to the given tab. |
ui.toggle_split |
{} |
Toggle 2-pane split mode. |
ui.activate |
{} |
Bring window to the foreground. |
ui.eval |
{"expression": "document.title"} |
Run an arbitrary JavaScript expression inside the app's WebView and return the result. |
The token in the session file is optional: a request is rejected only if it sends a wrong token (in an auth field). The server listens on 127.0.0.1 only, but any program on your computer can call these methods, including ui.eval, which runs JavaScript inside the app. Treat the port as open to every local program.
Headless CLI Commands
buffer:get,set,append,replace,replace-selectiontab:list,switch <id>ui:activate,toggle-split,eval <expr>
jev(such asverify)agent(prune)
- When output is redirected or piped, it is JSON unless you pass
--text. To save plain text, usemd-memo buffer get --text > note.md. --jsonworks on everybuffersubcommand.--tab <id>is honored only bybuffer get,buffer get --selectionandbuffer replace-selection.set,appendandreplacealways act on the active tab of the primary pane.
# 1. Print the current buffer (plain text in a terminal; JSON if redirected)
md-memo buffer get

# 2. Print it as JSON with metadata (hash, generation, length, line count, ...)
md-memo buffer get --json

# 3. Replace the buffer with text from the terminal stream
echo "# Updated note" | md-memo buffer set

# 4. Replace it only if it has not changed since you read it (optimistic lock)
echo "Safe update" | md-memo buffer set --expected-hash a1b2c3d4e5f60718

# 5. Append to the end of the buffer
echo "- [ ] New task" | md-memo buffer append

# 6. Replace one range (line:column, both 1-based)
echo "replacement" | md-memo buffer replace --start 2:1 --end 2:10

# 7. Print only the current selection; exits 1 with "no active selection" on stderr if none
md-memo buffer get --selection
md-memo buffer get --selection --json
#   -> {"text": "...", "start": 12, "end": 48}
md-memo buffer get --selection --tab tab_2

# 8. Replace the selection with piped text, as one undo step
#    (refuses with a conflict error if the selection changed since it was read)
cat formatted.txt | md-memo buffer replace-selection

# 9. Check a shell command against the AST guardrail (exit code 0 = safe)
md-memo jev verify "git status && npm test"
# [SAFE] Command passed AST validation: git status && npm test

# 10. A blocked command exits with code 1; --json prints the verdict as JSON
md-memo jev verify --json "rm -rf /"
# {
#   "isSafe": false,
#   "reason": "破壊的コマンド \"rm\" は安全基準により実行を拒否されました (Destructive command blocked)",
#   "command": "rm -rf /",
#   "rule": "destructive",
#   "subject": "rm"
# }

# 11. Choose how strictly the guard judges: strict (default, for one-click paths
#     nobody reviews), reviewed (a person confirms before running), or unattended (hooks)
md-memo jev verify --mode strict "sudo rm -rf /"
# -> blocked (exit code 1), in every mode
md-memo jev verify --mode reviewed "git status"
# -> safe (exit code 0)

# 12. Prune a Markdown file down to what is relevant to a query
md-memo agent prune --query "login bug" --file notes.md
Limits and details (jev verify exit codes and modes)
jev verify [--mode strict|reviewed|unattended] <cmd>runs the same deterministic, always-on AST analysis that the GUI's run gate uses. It runs entirely locally, and nothing leaves your machine.- Exit codes:
0safe,1blocked,2warning (not known to be destructive, but the guard cannot vouch for it). - Modes: The mode does not change the rules, only how seriously a finding is weighed, because who is watching differs.
strict(the default) is for one-click paths where nobody reviews the command before it runs,reviewedassumes a person confirms before running, andunattendedis for hooks. - A command such as
sudo rm -rf /is reported as blocked in every mode.
Let an AI agent configure MD-Memo
Which file, who edits it, and when it takes effect
| File | Where | When it takes effect | Who edits it |
|---|---|---|---|
config.jsonApp settings (keys, models, shortcuts and more) |
Windows: %APPDATA%\md-memo\macOS: ~/Library/Application Support/md-memo/ |
When you restart MD-Memo. It is read at startup, and the whole file is rewritten every time you save in the settings screen | The agent, only while MD-Memo is fully closed |
agents.yamlAgent, alias, notation and snippet definitions |
Per project: <scraps folder>/.md-memo/agents.yamlor the app's settings folder |
On the next slot run. If it has a syntax error, MD-Memo silently falls back to the defaults | The agent, or you (even while MD-Memo is running) |
Project .envFor agent CLI keys |
The project root (see Delegate: agents) | Every time a slot runs. It is the only env file read when an agent runs | The agent |
| Environment variables | The OS user environment variables | For processes started after you set them (see the fold-out below) | The agent (when you ask for it in the request) |
To move a working setup to another PC, do not ask the agent to copy files; use a settings package (Export and Import Settings) instead.
- Quit MD-Memo completely and back up the filesOn Windows, quit from the tray icon (closing with ✕ leaves it in the tray). On macOS, press Cmd+Q. The backup will contain API keys, so keep it inside the settings folder
- Give the agent a request from belowTell it to read
skills/md-memo/SKILL.mdfirst (see the link below) - The agent edits and validatesAsk it to check the JSON and YAML syntax too
- Start MD-MemoStart it as usual, from the Start menu, Finder or the tray
- The agent checks each featureAsk it to report what it could and could not confirm
Request 1: Set up Gemini in one go (image OCR, voice input, Mermaid image rendering)
Please set up MD-Memo for Gemini (image OCR, voice input, and Mermaid image rendering).
First read skills/md-memo/SKILL.md and skills/md-memo/references/setup-guide.md.
Before you edit config.json, ask me to quit MD-Memo (tray → Quit) and make a backup. Then put the Gemini key I give you only in vision.apiKey (voice and image inherit it).
For voice, set voice.model to gemini-3.5-transcribe, apiStyle to auto, and languageCodes to ["ja-JP"] (replace it with your language, or leave it empty to auto-detect). For images, set image.model to gemini-3.1-flash-lite-image.
Also check the environment and prerequisites these features need (network, microphone permission, general.pasteImageOcr and so on), and set up anything that is missing.
If something needs to be installed or an OS privacy setting needs to change, show me the command and get my permission before you run it.
Never print or commit the key.
After the restart, check each feature with a checklist, and report what you could and could not confirm.
Request 2: Add or change an agent, and put its API key in the project's .env
Please add <agent name> to MD-Memo's agents.yaml (the global one directly in the settings folder, or .md-memo/agents.yaml in the scraps folder).
First read skills/md-memo/SKILL.md and skills/md-memo/references/setup-guide.md.
Make a backup, and keep every existing agent and notation (slot_profiles / recipes).
Check the flags with <command> --help, and do not add any flag that skips permission prompts.
Put that agent's API key in the .env at the project root (KEY=value format, UTF-8 without a BOM). Do not print the key.
If Git sync is enabled for the scraps folder, add .env to .gitignore first.
Validate the YAML. If you changed notations (slot_profiles / recipes), tell me that MD-Memo must be restarted.
Request 3: Check every feature's prerequisites and set the missing environment variables and settings
Please check the prerequisites of each MD-Memo feature, and set any missing environment variables and settings.
First read skills/md-memo/SKILL.md and skills/md-memo/references/setup-guide.md. Then, one feature at a time, check every feature in the table in section (e) of setup-guide.md, "Per-feature prerequisites and verification": whether what it needs (installs, keys, environment variables, settings) is in place.
Set whatever is missing in the right place: config.json after MD-Memo is quit (backup required), agent definitions in agents.yaml, agent CLI keys in the project's .env, and everything else as OS environment variables.
MD-Memo's own LLM keys go only in config.json (environment variables such as GEMINI_API_KEY are not read by MD-Memo).
If something needs to be installed, or an OS privacy or firewall setting needs to change, show me the command and get my permission before you run it.
Never print or commit keys.
At the end, report each feature in a table as "confirmed / not confirmed / not checked".
Prerequisites per feature and how to check them (table)
The agent reads this table from section (e) of skills/md-memo/references/setup-guide.md. You can also use it to check by hand.
| Feature | What must exist | Config key / variable | How to check |
|---|---|---|---|
| Text LLM (Ctrl+L, Alt+C, presets) |
Local: Ollama and ollama pull qwen2.5:latest (or "Install Gemma 4" in Settings → AI Models). Cloud: a Gemini or OpenAI-compatible key |
text.baseUrl, text.model, text.apiKey (Ollama needs no key) |
Local: curl http://127.0.0.1:11434/api/tags returns 200 and lists the model. In the app: select a sentence, press Ctrl + L, type "translate to English" and press Enter. The translation appears below the sentence |
| Ghost text | Same as above (a small model is recommended) | autocomplete.* |
Type 2 or more characters and pause for 0.5 seconds: a dim suggestion appears. The status bar says "Predict: ON", and Tab accepts it |
| Ollama auto start and stop | MD-Memo starts Ollama when a request to 127.0.0.1:11434 fails on /api/tags. If you move text and autocomplete off 11434 and save the settings, it stops Ollama (this ends all of that user's Ollama processes) |
None | ollama list (on some installs, running the ollama command alone starts the Ollama app) |
| Image OCR (Ctrl+V image, Mobile Drop photos) |
A Gemini key, or a local vision model (ollama pull qwen2.5-vl:latest, and vision.baseUrl set to http://localhost:11434) |
vision.*, general.pasteImageOcr: true |
Copy only an image and press Ctrl + V. It becomes Markdown |
| Voice input | A Gemini key (voice.apiKey, else vision.apiKey), the model gemini-3.5-transcribe, and microphone permission |
voice.* (no environment variable needed) |
Ctrl + Shift + R shows the marker. Speak, then press it again or stay quiet for a while, and it becomes text |
| Microphone permission | WebView2 asks for permission at the first recording. On Windows, allow desktop apps in Settings → Privacy & security → Microphone. On macOS, allow it in System Settings → Microphone (macOS behavior is not yet verified) | None | If you see "Could not use the microphone", permission was denied or the OS blocks it. Do not delete %LOCALAPPDATA%\md-memo\webview without the user's consent |
| Clipboard permission | The Ctrl + Shift + V fallback and Mobile Drop's "Text from PC" read the async clipboard. WebView2 may ask the first time | None | Copy rich HTML and press Ctrl + Shift + V. It becomes Markdown and a toast appears |
| Mermaid to image | A Gemini key and a network connection | image.apiKey (else vision.apiKey, text.apiKey), image.model, image.aspectRatio, image.resolution |
Put the caret in a ```mermaid block and choose "Diagram: Generate Image with Gemini" in the command palette. You get an image link (save the note first) |
| Mermaid from text | Text LLM | text.* |
Select text and choose "Diagram: Convert Selection to Mermaid" in the command palette |
| Command Bar (Ctrl+E) | The tools you pipe through must be on PATH (jq, sort, tr, duckdb and so on) |
None | Select some lines and press Ctrl + E (if the badge says "AI CLI", press Tab), type sort -u and press Enter. The command runs in the app's working directory |
| Command Bar AI mode (Ctrl+E, then Tab) | Text LLM (or cli.*) |
cli.model and others |
Type "list files here" and press Enter: a command lands in the bar. Read it, then press Enter to run it |
| Slot agents | Install and log in to every CLI you use (claude, codex, ollama, agy and so on). The GUI app must be able to see PATH |
Keys go in <project root>/.env, or in the CLI's own login |
Settings → Agent shows whether the selected agent is available (a PATH lookup, cached for 30 seconds). Write {{ say hello }} and press Ctrl + Enter: the result lands. The error エージェント起動失敗 (inserted in Japanese in both UI languages) means the command is not on the GUI's PATH |
| Auto selector (Ctrl+Enter) |
For AI tasks: the text LLM (as above). For agent tasks: an installed agent CLI (see Slot agents). Command tasks need only the command itself on PATH | autoSelector.enabled, autoSelector.agentConfirm (both true by default; a config without them gets the defaults) |
Write a line such as "Translate the checklist above into Japanese" and press Ctrl + Enter: the line becomes [[ @llm ... ]] and the answer lands below it, in a block. Settings → Agent shows the two boxes in the "Auto selector (Ctrl+Enter)" group |
| Quick Actions | Not needed for the local rules (an external engine is optional) | action.* |
Press Ctrl + J in a note with text: up to 3 cards appear. An sh card runs in the app's working directory |
| Git sync | git on PATH. An empty remote repository. Credentials that work without prompts (a credential manager or an SSH key; prompts are disabled) |
scraps.scrapDir, scraps.gitSyncEnabled, scraps.gitRemoteUrl, scraps.gitRemoteBranch |
git -C <scrapDir> remote -v, git -C <scrapDir> ls-remote --heads origin. In the app: Settings → Sync, "Test Connection", then "Link / Init". Add .env to .gitignore first |
| Mobile Drop (same LAN) | Phone and PC on the same LAN (no AP isolation or VPN in the way). If asked, allow MD-Memo through the Windows firewall on private networks | None | Ctrl + Shift + U shows a QR code and http://<LAN IP>:<port>/?token=.... Photos need vision.*, and voice needs voice.* |
| Mobile Drop (over the internet) | Install cloudflared yourself (Windows: winget install --id Cloudflare.cloudflared -e, macOS: brew install cloudflared). MD-Memo looks for it when you press the button, so no restart is needed |
None | cloudflared --version. Press the tunnel button in the dialog: an https://...trycloudflare.com/?token=... address appears within 15 seconds. Data passes through Cloudflare, so do it only when the user asks |
| Global summon key | None | shortcuts.globalSummon |
Press it from another app. If it clashes with another app at startup, no error is shown. If you change it in the settings screen and the OS refuses, it reverts and a toast appears |
| Windows prerequisite | Microsoft Edge WebView2 Runtime (MD-Memo cannot start without it) | None | Start the app |
| macOS prerequisite | macOS 10.15 or later. For a build without Apple signing, the first launch needs right-click → Open, or xattr -dr com.apple.quarantine "MD-Memo.app" |
None | By design there is no tray. Use the Dock icon and the hotkey to bring the window back |
About environment variables (what is read and what is not)
- Variables MD-Memo itself reads:
TYPESAFE_API_KEY(elseJEV_API_KEY),OPENROUTER_API_KEY(CLI only),JEV_MODEL,JEV_API_URL, andPATHand similar. - Variables it does not read:
GEMINI_API_KEY,GOOGLE_API_KEY,OPENAI_API_KEY,ANTHROPIC_API_KEY,OLLAMA_HOST. MD-Memo's own LLM features read their keys and URLs only fromconfig.json. These variables help only the external agent CLIs that read them. - GUI apps do not inherit them: An app started from the Start menu or Finder does not inherit shell-profile variables. On macOS, MD-Memo repairs only
PATH. For other variables, use the project's.env. - Saving on Windows: Save a user environment variable with
setx NAME "value", fully quit MD-Memo from the tray, and start it again. - A good split: agent keys in
<project root>/.env, MD-Memo's own keys inconfig.json, and OS environment variables only for additions to PATH and the Jev-related ones.
- Show, log, paste into chat or commit API keys,
config.json(and its backups),.envorsession.json. Keys are masked like "set (...last 4 characters)". - Start a second MD-Memo or force-kill the process. You quit it from the tray.
- Edit
config.jsonwhile MD-Memo is running. Do not delete a key to "reset" it; write an explicit default. - Read settings with
md-memo ui eval, or callwindow.backend.*. - Point the scraps folder at a repository, your home folder or a drive root. Put
.envin the scraps folder without git-ignoring it. - Add a flag that skips permission prompts (such as
--dangerously-skip-permissions) to an agent definition, or register a CLI it has not checked with--help. - Start a Cloudflare tunnel, install
cloudflared, change OS microphone, firewall or privacy settings, or run theollamacommand without your request. - Say "it works" without going through the checks. Anything it could not confirm should be reported as "not confirmed".
The folder to point the agent at is skills/md-memo. When you make a request, tell it to read SKILL.md first. You can also copy the folder into your agent's skills folder.
External Editor Recipes
Neovim / Vim Send Command:
" .vimrc / init.vim
command! MDMemoSend :w !md-memo
PowerShell Clipboard Append:
Get-Clipboard | md-memo buffer appendDump a tmux pane into your scraps:
tmux capture-pane -p | md-memoGlossary: internal names and what they refer to
Release notes, configuration files, and CLI subcommands still carry the names these features were built under. You never need them for day-to-day use, but here is what they mean when you run into them.
| Term | Which feature | What it means |
|---|---|---|
| Jev | Quick Actions | An external judging / inference model provided by TypeSafe AI — it is not built into MD-Memo. It is used only when you enter an API key, or point the Base URL somewhere other than the OpenRouter default, under Settings → Agent → Suggestions (Quick Actions); otherwise MD-Memo uses its built-in local rules. The name also survives as a CLI subcommand, as in md-memo jev verify, but jev verify (the AST check) runs entirely locally. |
| Slot | Delegate to an agent | The {{ }}-style notation in your note, and the mechanism that calls an agent from it. slot_profiles in the config file is where those notations are defined. |
| Auto selector | Delegate · Auto Selector | What Ctrl + Enter does with a line that is not already a slot. It decides, by fixed rules on your PC, whether the line is for the built-in AI, an agent or a command. It uses no network and no model, and it does not use Jev. It is not the quick selector, the popup that opens when you type {{. |
| Result block | Auto selector | The answer written below a task line, between two HTML comment lines (<!-- md-memo:res id --> and <!-- /md-memo:res -->). While the task runs, a one-line md-memo:run marker stands in for it. |
| Snippet | Auto selector | A ready-made task or command that you insert from the {{ popup, from the command palette ("Insert task snippet") or with a short word and Tab. Your own snippets, under snippets in agents.yaml, join the built-in ones. |
| Alias | Delegate to an agent | An extra name for an agent, set with aliases in agents.yaml. {{ @cc ... }} calls claude-code because cc is one of its default aliases. |
| System 1 | Quick Actions | The name for the fast inference mode that answers without deliberating — borrowed from the intuitive half of human thinking. It is why suggestions do not keep you waiting. |
| 3-Beam | Quick Actions | The approach of offering up to three candidates at once rather than committing to one. Those are the three cards you see. |
| MAP-Elites | Quick Actions | The algorithm that keeps the three cards from resembling each other by picking candidates of different character, such as a Run card next to a Delegate card. Which kinds appear depends on what you are writing and on whether an external model is configured. |
| AST guardrail | Quick Actions / md-memo jev verify |
Parses a shell command as syntax before running it and refuses it on detecting a destructive command, a write into a protected system directory, and similar patterns. It covers known dangerous patterns, not every possible risk. |
| Ghost Diff | Delegate to an agent | The 3 px amber line shown on the left edge of the editor, for the time you set, right after an agent's result is merged into the note. It does not mark only the changed lines. Esc undoes the change while the line is showing and for one second after. |
| Hover Peek | Task panel | The latest output line from a running agent, shown so you can peek at its progress. |